Thinking going back to corni kegs!!

The Homebrew Forum

Help Support The Homebrew Forum:

This site may earn a commission from merchant affiliate links, including eBay, Amazon, and others.
Bri if you are struggling with judging the length of pipe inside a push fit fitting pre mark the pipe with a felt tip pen about an inch from the end you are pushing in, that will give you a reference point as to how much pipe is inside the fitting.

Thx pal...
There some tasks just need two hands lol..
But I'm a tryer lol
 
Wasn't happy with the gas fitting s I tried the old foamy water!!! ****!
Do off with it put my last one one.
Bingo!

Setting up the tap for now!
Looking at the beer line...is it the right thickness? And have I nuff length (no pun intended!)
2m 3/8 beer line

Well for now...waiting for my holesaw 22mm for the fridge door and attached the tap there..left hand side leaving the right hand for a future tap..
But by that time the tank would be external to Fil two corni's.
THX for viewing

Your wife is coming up the stairs, and she wants a bath...........:mrgreen:
 
Looking Good, Almost there.. ;)

before running it, it may be worthwhile sealing up any exposed insulation foam now exposed in the door void if any.. if any moisture penetrates the insulation foam used it can go green and mankey with algae/microlife common bathroom silicone sealant is good for this.
Nice one pal...
I'm chuffed with the hole tighter than knats chuff!!! So it'll only need tiny bit..
 
Mornin
What a emazing sleep! A massive meal..A few glasses of merlot, a pint of draught Amstel and 2 jagabombs..taxi home and tried a merlot...no medication! 'Good nite Vienna!'
Not the best mix of alcohol I admit...
But no hangover etc..
Ok I'm a light weight! Have to control what I drink and food etc.
Anyways.........
Moving on with my corni keg set up!
....................................................
Only 10l of centurial (never get the spelling right!) Brown Ale, into the cleaned n sanitized keg.

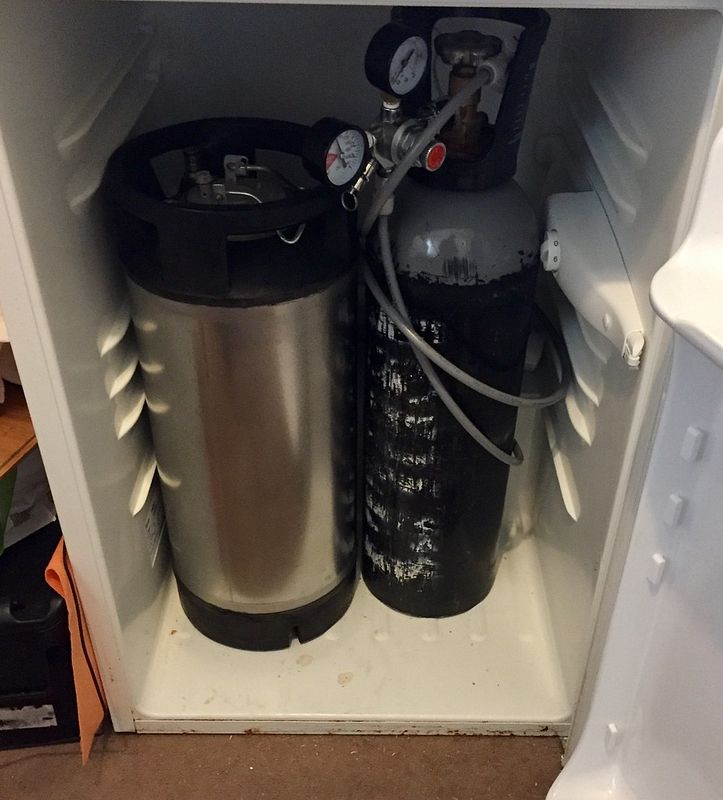
Put the fridge setting about 6C (not sure is the temp right, got confused with a thread of serving temps...??)
And left it til today.
So I've been looking on all the threads, YouTube channels....BOOM!!! my brain retention switch went!!!!!! (U know me by now...too much info overload!!)
So for safety and my peice of mind I just left it till yous guru's can nurture my brain cells into action...please & always I appreciate your help n guidance.
One thing we know is:
1. 10l brown ale.
2. No priming sugar.
3. The temp of the corni in the fridge...6.5C...what should the temp be?
4. of beer line 2m..(so far I don't know the exact length needed..(the threads working out the length, as you can imaging...went Pete Tong!)
5. Finally looked at the options of carbing the beer...at that stage!! It just went mush into overload...haha!

Like I said just sealed the keg and put into the fridge.
If you can help me the next stages..I'll write them down (in my google sheets..bloody great for my notes!)
…………...........................................
Once again THINKING OUT LOUD!
I'm thinking myself what I should do! Instead of jus asking every time..
Reet!
Getting the fridge and beer upto temp...attach the gas line to XX psi..
And leave it for XX of days.
Take of the gas...purge the keg.
Attach the gas again...this time put XX psi to serve..leave XX of days.
Then check..
Is this in your field of view of what you would do?
No wonder I got fried there so much garbage out there...do this..naaa! This is the best way!! Naaaa! That wrong!! I do it this way!!! Blah blah blah!!!
AnywAys....I'm woffling on as usual..
Any suggestions and tips or just tell me I'm a complete.....

Lol
 
http://www.kegerators.com/articles/carbonation-table-pressure-chart.php
if you know the level of condition your after for a brew, look it up in the table and read off the optimum temp and pressure to set,
set the pressure and temp, leave the keg alone for a week or 10 days and it will be perfectly conditioned without wasting a single spurt of co2, the optimum temp and pressure will also maintain the perfect level of condition throughout the kegs pouring life.

you can speed it up by shaking or agitating the keg but this will also disturb the sedment gathering at the base of the keg as the beer clears.


beerline length is all about reducing the keg pressure to a nominal drop at the tap point, 3/8" beer/gas line has bugger all restricting properties until you start talking 20+meters, so folk tend to use thinner 3/16" microline which iirc restricts pressure at a rate of 1 to 2 psi per foot length.

The idea is to restrict the keg pressure or balance it off with the thin line so at the tap there is no great difference in pressure and the beer will retain its condition and not foam out ;)

In practice some regs can be a pita to set at lower pressures we like, so bearing the above in mind, tweak your system according to how it responds.

i would suggest starting off with 4-5foot of thin 3/16" line between keg and tap i use about 5 ft

which is great for beers served upto 12-15psi..

Great post Fil,
Ohhhh I must have 3/8 line!
So I would need a reducer thingy and 3/16" line about 4 ft???
Great online shopping wup wup!
Is there any links for 3/16" silicone line pal? I can't get away with the hard line one handed is gets all ova and frustrated me.
So and new John guest for the black adapter, a reducer and I think a new one for the tap shank! Unless I find out to take the addspter off!! If you know what I mean?
4ft 3/16" silicone line aswell...have I miss anything?
Thx pal getting there...
At least the Ale is sitting ok in the fridge with 20 psi and chilled..
Great help as always pal..
 
Hi!
Yes, you'll need two reducers, one at the keg end and one at the faucet. 3/16 vinyl is much easier to handle than that awful 3/8 grey stuff - coil it up and apply a bit of what my late father-in-law called "blackly tape" - insulation tape to hold the coil in place.
 
Hi!
Yes, you'll need two reducers, one at the keg end and one at the faucet. 3/16 vinyl is much easier to handle than that awful 3/8 grey stuff - coil it up and apply a bit of what my late father-in-law called "blackly tape" - insulation tape to hold the coil in place.

Thx Col,
Great pal.
If I send the links I was thinging of could you guide me...my internet shopping is a minefield n I get confused so easy...
TBC
 
Thx pal,
Ordered now pal.
Thank you so much..I'd get confused with all the fittings etc and if I didn't write everything down I'll forget what I've ordered and buy it again lol been there so many time..thing this is my worst trouble..(apart from thinging lol)
Off to do a bit of brewday!! :-)
Later my m8
 
Getting there...
Thought I ordered the John guest fittings aswell....obvoulsly not!!!
I'm a balloon knot!!!
Please help further...
Could I use the existing attachments? N how can get them off etc...or do I buy new ones..confused now! lol doesn't take much tbh
 
Hi!
The short "stubs" push into the JG fitting on your black disconnect. You already have these.
Look back at your photos on page 9.

Disconnect the current beer line and replace with the new line.
You should be able to do the same at the faucet, but I don't know what fitting you have.
 
Thx Col
A quick YouTube Vidio how to take old line out....lol
Thought it was going to be a two handed affair!!
Pics once finished...
Think I had the Ale on gas for 4-5 days now!!
Reckon I could try it?
Turn off the co2...purge the keg...and turn the co2 to the right serving setting...I'll look at the notes from Fils post about serving temp and the co2 pressure...
It'll be later on the nite..coz our lass is at work and my daughter needs quality time with her old man lol
Once again thank you pal
 

Latest posts

Back
Top