building an (semi) automated brewcontroller

The Homebrew Forum

Help Support The Homebrew Forum:

This site may earn a commission from merchant affiliate links, including eBay, Amazon, and others.

Zwickel

Active Member
Joined
Aug 25, 2009
Messages
58
Reaction score
0
Location
Homburg, West-Germany
g´day fellow brewers,

before I´m going to introduce my automated brewing system to you, I´d like to know what funktions would be very important at the first place to you.

There are so many different brewing systems out in the world, guess there are only a few looking and working identically.

So it would be almost impossible to create an electronically controlled system that matches to all of the brewers demands.

I´d highly appreciate if you could tell us, what functions would be indispensable/compulsory for your personal brewing system.

For example I´ll start with my own demands:

doing stepped mash, therefore need a ramp temp controller
hence I´d need heating system that automatically gets switched on and off after demand;
a time controller that controls each period of time (rests, boiling time a.s.o.);
a water level controller to fill the MLT and HLT with the right amount of water, hence equipped with a solenoid valve to switch the water flow;
a level controlled wort pump, could also switched on and off manually;
an elecronically controlled stirrer, either way speed controlled and direction controlled (forth and back),
an alarm function to call the "Braumeister" if something is going wrong;
a temp monitor that shows the inlet and outlet temps of the wort chiller;
a CIP (cleaning in place) system;

so what else?

I´d highly appreciate your comments/ideas to that, so we might be able to parse my existing system into parts and reassemble to your own needs.

Cheers :cheers:
 
While the geek :geek: in me thinks that it's a really good idea and would be fun to build and test, the brewer in me would still prefer to do some stuff by hand, rather than just sit back and press a button.

You're right about it being impossible though. With the exception of maybe a lot of the micros who use Dave Porter's kit, every brewery is different - and even then, I'm sure some of them have made some mods.
 
Hey Zwickel, I'm afraid I'm nowhere near even thinking about my own automated system - maybe once I've gone AG. However, I would love to hear about / see more of yours - it looks awesome. :cheers:
 
jamesb said:
.... the brewer in me would still prefer to do some stuff by hand, rather than just sit back and press a button.
...snip

that´s what I was thinking too for a long time.........

commsbiff said:
.... However, I would love to hear about / see more of yours

okey-dokey, I´m going to tell you my story

........But sometimes it has happened that a telephone call distracted me, or the Missus asked me something to do for her, so the brew was overshooting by time or the boil was far too vigorous, so there was an overboiling wort, or forget to add the hops....what ever.

I was considering how to get a more reliable/reproducible brewing system, so my preferred beers could end up more recognizable and not to forget, I´d have a little bit more relaxed time for doing something else, for example reading homebrewing forums ;)

Here you can see my brewing system at first, so you may imagine how things are working klick here

hmmm.....first of all, I wanted to get an ignition system for the gas burners. Since to lighten these burners was a pain in the ****, mostly singed the hairs on my arms, so my colleagues at work did exactly know when I had my brewdays.

So, the priority was to build an ignition system that works absolutely reliable and safe, so I´d need only to switch on and off the burners, later on, a computer system should do that, but at first just a switch should do the job.

Since I was an absolutely noob on gas burners, I had to learn how a gas driven central heating works, what is necessary to start and stop a gas burner.
So I found out, there are some gas burner controllers on the market, just to need one, need a high voltage transformer, a solenoid valve for the gas and an ionisation electrode that watches the flame.

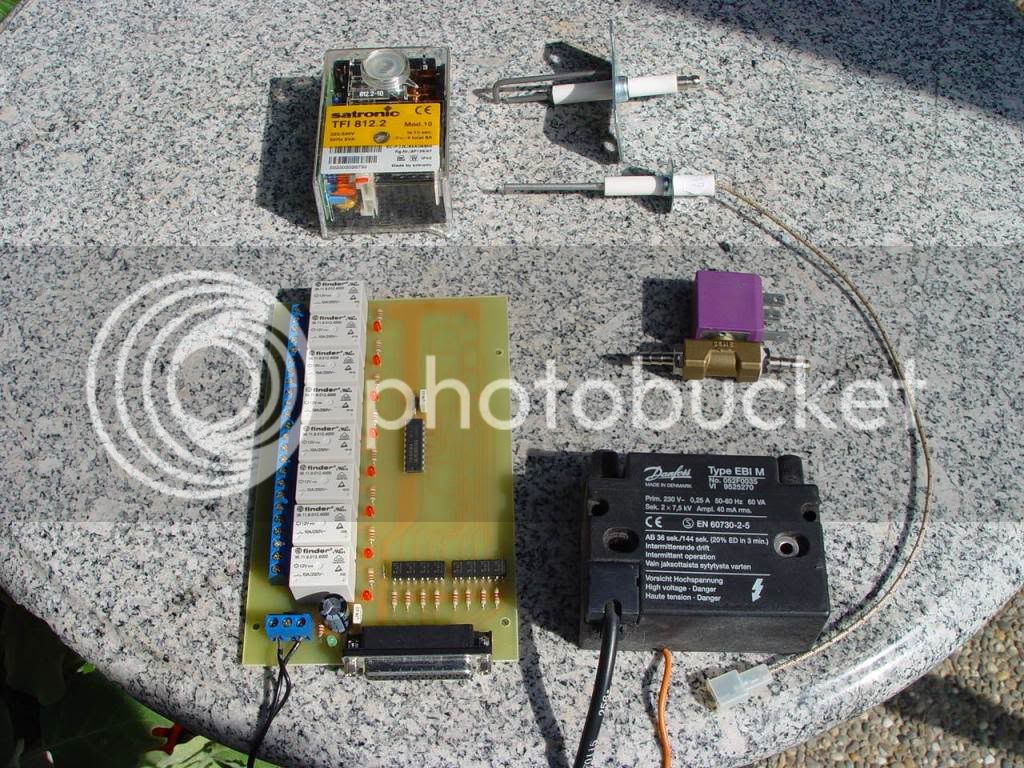
Here you can see the parts, the relais card on the left is used later in the computer

3842.jpg


the burner controller, the ignition electrode, the ionisation electrode, the solenoid valve for the gas, the ignition transformer.

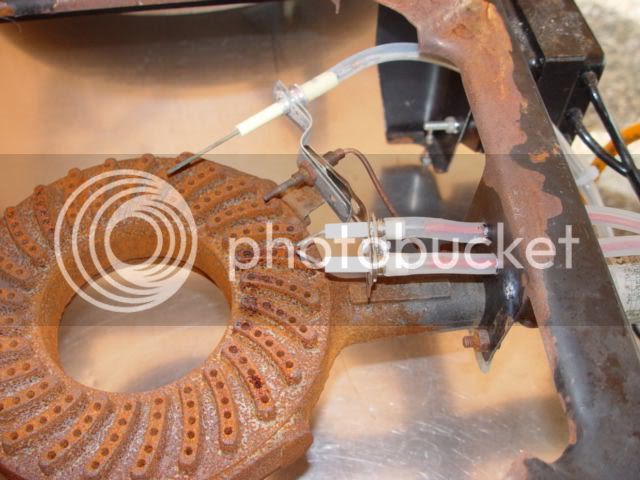
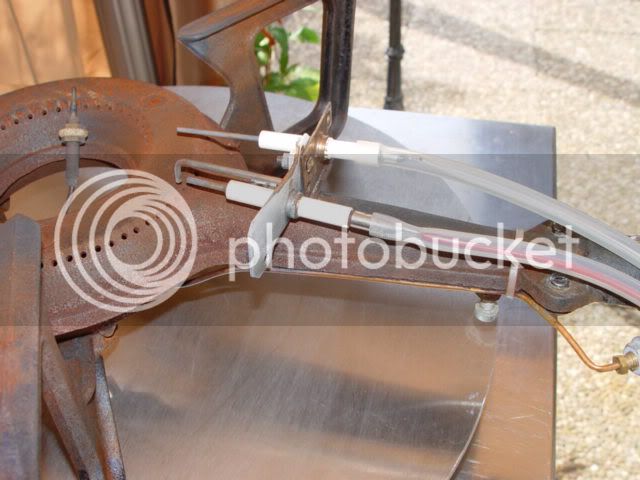
Mounted on a burner it looks like that:

1DSC02752.jpg

2DSC02753.jpg


So, I think that´s all for today, I´ll continue the thread soon.

Cheers :cheers:
 
Is the single electrode a flame sensor? And were there reasons why you went for spark ignition over a pilot jet?
 
ano said:
Is the single electrode a flame sensor? And were there reasons why you went for spark ignition over a pilot jet?
yeah, the single electrode is a flame detector, so called ionisation electrode.

I´m brewing outside in our backyard, so I have to protect the burners from wind.
A pilot flame is a very weak flame, must be watched as well, otherwise if the wind blows out the pilot flame, the gas is blown in the air.
Another reason is, whenever a burner gets switched off, there is a little deflagration that blows out the pilot flame.
I was experimenting with that as well.

Cheers :cheers:
 
Zwickel said:
ano said:
Is the single electrode a flame sensor? And were there reasons why you went for spark ignition over a pilot jet?
yeah, the single electrode is a flame detector, so called ionisation electrode.

I´m brewing outside in our backyard, so I have to protect the burners from wind.
A pilot flame is a very weak flame, must be watched as well, otherwise if the wind blows out the pilot flame, the gas is blown in the air.
Another reason is, whenever a burner gets switched off, there is a little deflagration that blows out the pilot flame.
I was experimenting with that as well.

Cheers :cheers:
Thanks for that.
 
follow-up....

just to complete the gas burner story:

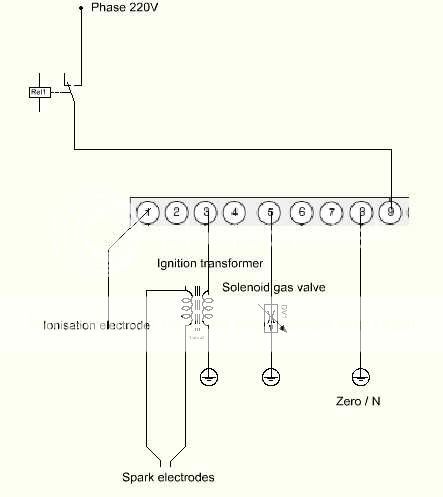
that little controller above left in the pic is the heart of all.

brenner443x497.jpg


as soon as the controller get under power, it switches on the i-transformer, 5 sec. later the gas valve.
if the i-electrode doesn´t detect a flame within 5sec., the controller shut off and start again.
The controller makes three attempts, if it doesn´t succeed, the gas valve is shut and goes into alarm.

As soon as the i-electrode detects a flame, the i-transformer is switched off and the gas valve is kept open.
Whenever the flame goes out, the controller start its procedure (3 attempts) from begin.

That way now I had a reliable and safe burner system, just to need to switch on and off the power to the controller.
These burner controller you may get very cheap at ebay, I paid around 20 to 25 Euro for each, have several of it.
Just have a look for "satronic TFI 812.2"

will be continued...
 
Thanks Vossy for your positive comment :cheers:

I´ve seen your thread where you discribed your selfbuilt HERMS heatexchanger.

I gotta say, that´s an awsome, excellent piece of gold, absolutely a Masterpiece.

Wait, when I´m going to describe the computer control for the mash temp, may be you could adopt some of the ideas to control your own system, because it doesn´t matter if the computer software controls an electric heater or a gas burner.
....if you´d ever need one.

Cheers :drunk:
 
You're drip feeding us like a nasty scag dealer! I want more infoz! when you're ready of course. I want to see the full gas setup in action as most online brit brewers use electricity and it's great to see an alternative setup (ie I hope to go gas in the future so using a tried and tested semi-auto gas setup is fantastic). Of course I want to see the whole thing, in detail, but am anxious.
 
Sorry folks for the delay, I had to sort out the pics for the follow up...

here we go:

Now that I had a reliable ignition system for the burners, needed only to switch on and off to get it work, I was thinking over how to let the computer do the work.
My first demand was to control the temperatures and the time. All I needed was a temp measurement system and a timer that could switch on and off, controlled either by time and temp and of course an output system that could control the switches.

I had to learn, that it was not easy to find temp probes that can be delivering digital values to the computer.
Most of temp probs such as Pt100 need an analog/digital converter and other stupid things.
That would be much too complicated to me and expensive too.

Fortunately I was not the only one over here who had such an idea. Friend of mine found already the solution.
There is a temp probe from Dallas Semiconductor, the 18S20.
http://www.maxim-ic.com/quick_view2.cfm/qv_pk/2815" onclick="window.open(this.href);return false;
That´s a tiny little micro processor in transistor shape that delivers digital values directly to the computer.

There are various programs in the internet just to read the DS18S20 temp probe, for example:
http://www.mrsoft.fi/ohj01en.htm" onclick="window.open(this.href);return false;

What I needed now was a program, that reads the 18S20 and that switches on and off a relais, depending on the temperature.

Since I was not skilled in programming, I had to negotiate all conditions with a friend of mine, he´s the programmer.
What he did was absolutely great, he built a ramp temp controller that reads the DS18S20 and, depends on the value, switches on and off the burners, also the pump, stirrer and other things.
but wait, later more of it....

First of all I had to put the Dallas semiconductor into an appropriate housing. What I needed was some temp probes in short form and others in long form.

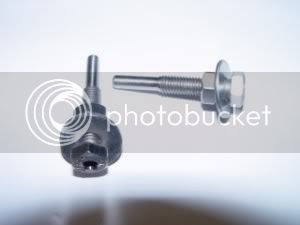
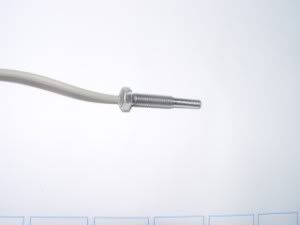
For the short ones I took a SS screw, drilled a 5mm hole from head, put in the DS18... and sealed it with epoxy.

temp4300x225.jpg
temp5300x225.jpg

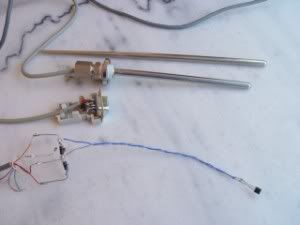
and the long one:

2759300x225.jpg


because the Dallas 18S20 was very cheap, paid 2.50€ for one, I got more and more temp probs.

.........
 
........

Once I found some chinese chopsticks made from SS, cutted and filled with a Dallas looks like that:

temp2300x225.jpg


All of the temp probes got sealed by epoxy, any two componets gluten would do the job.

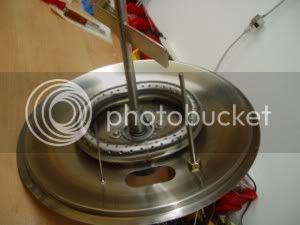
Here a pic how I installed the long temp probe to my mash tun, a view under the lid:

DSC02781300x225.jpg


You can see the sparge dispenser, the water level probe and the long temp probe.

Now the most complicated work has been done.

will be continued.....
 
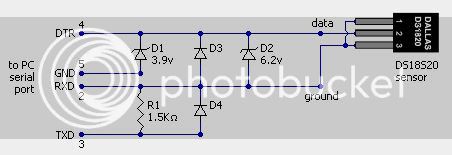
The Dallas gets connected to the serial port of a computer and it works in the parasite mode, that means, it takes the power from the serial port from the data line.

To adapt the one-wire temp probe to the serial port, you´d need the following parts:

circuit.jpg


D3 and D4 are Schottky diodes.

I have soldered that parts into the serial plug.

The brewing program reads the Dallas and sends the bits to switch relais to the parallel port.
At the parallel port you can switch on and off 8 relais, eiter by the automated brewing program as manual by a mouse click.

The parallel port relais card you can see in the pic I´v shown earlier in the thread.

Cheers for now :cheers:
 
Back
Top