Auto and manuall tuning a PID

The Homebrew Forum

Help Support The Homebrew Forum:

This site may earn a commission from merchant affiliate links, including eBay, Amazon, and others.

BeerCat

Landlord.
Joined
May 6, 2015
Messages
5,292
Reaction score
1,694
Location
East and West Grimblestbottom under the rye
Does anyone have any info on manually tuning a Inkbird PID? Mine was working perfectly but i was exploring the setting and accidentally "autorun" and now its all over the place. Obviously i should of noted the settings before i touched it. Retuned repeatedly and still the same. Does anyone have any advice as best to perform autorun ? I have tried it full of grain at 65c but it jumps over a lot which is not ideal and even after it finishes it still has large swings. Before it was keeping it to within 0.2c. I have heard people say they tuned theirs with spent grain. The fact that it does not turn off after it reaches target temps shows the setting are way off. I have looked into manual tuning but i really have no idea what the parameters mean.
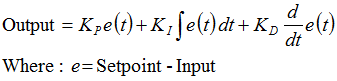
For instance i know they are proportional, integral and derivative but i have no idea what that really means or how they affect each other. I was hoping i could find a simple calc or clear online explanation but its all over my head. I have read the manual multiple times but that has not helped either. I have looked at articles like this but really hurts my head. Help please @fil :)
 
A couple of forum members were kind enough to give me the numbers from their setup but so far i am still getting overshoots. I dont exactly know why and need to do more tests but to save stressing out on brewday i have gone back to an STC and voltage regulator to control mash temps and its working really well. Only thing is you have to remember to turn the voltage down when it gets close to set temp.
Came across this thread http://www.thehomebrewforum.co.uk/showthread.php?t=73592&highlight=sous+vide where @peebee says
"I've an Inkbird ITC-100VH and it is pretty similar to that Sestos too (some slight difference to the decals). They are obviously churned out by a manufacturer in China and rebadged by any Tom, Dick or Harry. I have Auber Instruments PIDs too; they are slightly different (use two alarms not one, although the other PIDs might have a indicator for a non-existent second alarm) but I know people download the vastly superior Auber documentation and use it for their cheapo Inkbird. Can't fault the support from Auber, but there seems to be good support from Inkbird?

They all have fully configurable PID parameters which can be a bit daunting but here are some pointers:

  1. The "autotune" function can be a deterrent against madness, but can also set some very wild and unhelpful settings.
  2. There is a temptation to think our brewing systems are very responsive and fast. But "fast" refers to industrial systems that knock the spots off our systems. RIMS systems are faster (from the PID's perspective) than HERMS.
  3. Try P=22 for starters (if using Celsius, try 40 for Fahrenheit). Reduce by 2-3 at a time watching out for overshooting.
  4. Try I=350 for starters. I've no idea why "350" was recommended but seems to work well.
  5. Set D=2 (effectively ignore "D"), but for RIMS a slightly higher value may be better because they do create rapid "rates of change" compared to HERMS. I'm messing with the value set to 5 for RIMS.
  6. "t", "cycle time" or the period that the calculations are refreshed, is omitted in the documents but is an "autotune" value. Set to 2 for SSRs (SSRs are recommended but if directly controlling using mechanical relays set to 20 so as not to stress the relay too much)."
I know what you mean about the manual. Its hard to understand. I only figured out there was a manual and automatic mode after reading the Auber one.
Are the P I D parameters you refer to the same as M50 Iintegral time), P (Differential) and t (Hysteresis time) on the Inkbird? I hope so as its the first explanation i have found that makes any sense. :)
 
I've done a little bit of controls engineering in my time, usually for space heating or water heating using the PID capability of BMS systems. The process of tuning full PID loops from scratch still gives me nightmares, many years after my controls lectures at uni; google Ziegler - Nichols for an example.

I did however manage to stumble upon this response on Amazon that may be helpful, its under the customer question and answer section towards the bottom of the page.
https://www.amazon.co.uk/dp/B008GS2QFU/?tag=skimlinks_replacement-20
 
Last edited by a moderator:
I will admit to being totally out of my depth with the maths involved in the pid algorithm and most of what i will say here is based on my own experience and the posts ive read in here and similar forums on the subject so should not be taken as gospel..

the auto tune should derive the optimum parameters for operation when run with the production target temp set and the usual production volume of liquor in the kettle /hlt.. It can take hours to run through, but this can be shortened by preheating the water used for the auto tune to 30-40c before you run the auto tune.

Dont be preturbed by the pid overshooting by loads during the autotune. just let it be, and its not finished when it hits the target for the first time , its done when it tells you its done.. .

If using for more than 1 task ie hlt control and rims or herms control too or souseviede, as i understand things theoretically you should autotune under both circumstances to derive optimum operation parameters for both duties.. ( but if involving similar volumes and temps imho i cant see it making a significant difference)

However.... The Gods of brewery programming who trailed a blaize for the rest of us developing arduino brew controllers utilising the fantastic pid lib did so well in advance of the addition of the arduino pid autotune lib ;) and All of those programming heros ran with the default 20, 5, 1. settings ;)

And many folk have used pids out of the box without any autotune, no doubt someone will surface in here with a similar story sooner or later too ;)

good luck ..
 
Thanks for the help. Some good info there. Slowly starting to get my head around it and will start experimenting again soon. Probably going to try mashing in at 60c to start with and see what overshoot i get. I don't know if i have mentioned this before but i managed to boil a batch recently. I had a few that day so probably user error though. I bought a new PT100 probe to go in the mash and tested that last week and was only reading 90.2c when boiling. Going to look for a better quality as its already started rusting.
 
a dodgy chinese budget priced pt100 probe is possibly the weak link in your 'chain' there. my own limited experience with such probes is varied, i have one ebay china £1-2 probe thats been in use for years, others i have bought fell apart on opening the package, most sem to work but read a good 5C wide of the temperature and then fall apart. IMHO get a class B or better pt100 from a trusted seller and be prepared to spend £10-£15..

also if you move your brewpots about consider NOT attaching a probe to the pot, the trailing lead will get snagged and pulled every time you shift the pot (mine seem to at least..)
 
I recently upgraded from an STC1000 to a PID controller on the basis of more accurate control. Unfortunately it is totally dependent on your system as to how well the Autotune works. The Autotune works in a very structured "trial and error" way; it sees how long it takes to get a response to an output change, then it changes the values and has another go. Obviously most of this tuning goes on around a set point. I think the basic algorithm in the itc100 type units will have 3 goes, then switch back to just running.

But here's the rub. For Autotune to work, it relies on getting a response, and the more symetrical the response the better and more accurately it will subsequently control. A bit more power, temps go up, a bit less and the temps fall (OK, in reality the PID to SSR is via PWM, but that's detail) What will screw the Autotune is if it makes a change and times out before getting a response - this is the case for a really well insulated HLT or kettle where the cold own is way slower than the heat up times. At this point the Autotune will give garbage results, and you are better just trying P (M50) and I (t) values as described above, then changing them by small amounts as mentioned. Ziegler-Nichols does work if you get the system cycling, but again this is screwed by good insulation becauseof the asymmetric response. So, don't be disappointed if the Autotune doesn't solve everything, just persevere and you will get there! How do I know this? Well, for a living I'm a control/systems engineer, and no I haven't got my well insulated HLT properly dialled in yet. But I'm getting there!

Pat
 
Okay, here's my two pennies worth.

Think of a Cruise Control on a car.

The Speed that you want the CC to control at is the Set Point. Let's assume that you feed in a Set Point of 50mph.

As long as the speed of the car stays at 50mph the CC is happy.

How far the CC allows the speed to deviate from the Set Point before it decides to react is set by the "Proportional" part of the Controller. It would be unacceptable to allow the speed to drop to 45mph or speed up to 55mph, so let's assume that we set the "Proportional" to 1.0mph.

When the speed of the car deviates from the Set Point by more than the 1.0mph set by the "Proportional" it will operate to increase or decrease the accelerator and thereby change the speed.

The "Integral" decides how quickly the accelerator will be changed to increase or decrease the speed to bring the speed back to the Set Point. If the "Integral" is set 'Low' the response will be slow, whereas if it is set 'High' the response will be quick. Too slow and too quick may both result in overshoots.

The "Derivative" is a bit more complicated and is best described by an Instrument Technician who asked me "When you go to the toilet for a **** do you take your trousers down?" I obviously said "Yes." and he replied "That's your Derivative kicking in!" :lol:

When the speed of the car starts to move away from the Set Point the "Derivative" decides how far it is allowed to move towards the "Proportional" limit before it allows the "Integral" to start taking action.

I suggest that you start by turning the Derivative down to zero (it's not even required on some controllers), and just use the Proportional and Integral settings to bring the system under reasonable control. After reasonable control is achieved a gentle introduction of the Derivative should stop or reduce overshoots.

Hope this helps. :thumb:

BTW

In the summer my Brew Fridge obviously needed less heat and the Brew Fridge TC started to overshoot. I used the TC on the 40W Heater to reduce the heat output of the source and bring the Brew Fridge back under control. :thumb:
Gawd, you know some sh.. Dutto:thumb:
 
Very good explanation there Dutto. I'll second the recommendation to start with 'D' at zero. In an oven-based system I built and wrote the firmware for a few years ago I ended up with just 3/1/1 for the co-efficients. I would not trust an auto tune algorithm to come up with useful terms in any reasonable time.

Another thing. If you can heat up to the set point before engaging PID then you should do that to avoid a problem with PID called integral windup. This happens when your actual temperature is far away from the set point for a long time and so full power is applied and the cumulative error stored by the algorithm can build up to a very large value. When you exceed the set point the cumulative error will start to decay but it will take a long time to do that and all the while you're getting overshoot, which will then turn into undershoot and the algorithm will oscillate like that for some time. Some controllers cap the maximum error in an attempt to limit windup but you're unlikely to know if you've got one that does that.
 
... Are the P I D parameters you refer to the same as M50 Iintegral time), P (Differential) and t (Hysteresis time) on the Inkbird? I hope so as its the first explanation i have found that makes any sense. :)
Just seen this thread: Blimey, it's got my name on it! I've not thought of people actually taking notice of what I say!

But to answer the (very old) question: Haven't a clue. My Inkbird PID hasn't been pressed into service yet so everything I wrote refers to the Auber PIDs and the advice given me for them. "M50"? Looks like the Inkbird PID is set to give me a rough time.

"Dutto's" explanation helps me a lot to explain the settings I was given. All I'd add is: I recommend 2 for "D" rather than 0 simply because 0 and 1 do something else, so 2 is 0? For "P" "Dutto" talks about "let's assume ... 1mph", so that doesn't mean set "P=1". For Auber I was recommended 22 (40 for Fahrenheit), it's whatever fanciful units the PID is talking in, and it might well change between makes? "Dutto" didn't help me understand why "I" was recommended as 350 to me (out of possible 9999), but that might well change between makes? But I think what I said about what is considered fast and slow in "PID world" fits here, i.e. that we do not deal with fast systems so don't be tempted by big values.
 
Gawd, you know some sh.. Dutto:thumb:


Thank you for explaining it to @Barnbrian for me @dutto.

By reducing the TC of the fridge you are reducing the overshoot or the “error” in the control loop not removing element in that loop. And as Dutto has explained in the right situation, for the right reasons it improved his temp control. voila.


Sent from my iPad using Tapatalk
Dutto's example has nothing to do with what you and I were discussing so explains nothing.
I still stand with my original statement that the fridge thermostat should be set on it's coldest setting and all control is by the Inkbird.
 
Dutto's example has nothing to do with what you and I were discussing so explains nothing.
I still stand with my original statement that the fridge thermostat should be set on it's coldest setting and all control is by the Inkbird.

But a lot of us use the Brew Fridge for fermentation at anything from +10 degrees up to +24 degrees! In this case the controller mainly controls a Heater which may also have its own TC fitted to it.

I set my Brew Fridge up in the winter when the average ambient temperature in the garage was about 6 degrees. The overshoots started occurring when the ambient temperatures rose to above 14 degrees.

To save faffing about with the Inkbird, I considered it to be a lot easier to just reduce the output of the Heater itself.

With regard to the analogy of a Cruise Control on a car, it is a "PID Controller" that many people are already familiar with. The Cruise Controller on a car operates in exactly the same manner as the PID Controller used to control temperature in a Brew Fridge ...

... but the only thing a car driver can generally adjust is the Set Point for the Speed; everything else (P,I&D) being set by the manufacturer. :thumb:
 
But a lot of us use the Brew Fridge for fermentation at anything from +10 degrees up to +24 degrees! In this case the controller mainly controls a Heater which may also have its own TC fitted to it.


I set my Brew Fridge up in the winter when the average ambient temperature in the garage was about 6 degrees. The overshoots started occurring when the ambient temperatures rose to above 14 degrees.


To save faffing about with the Inkbird, I considered it to be a lot easier to just reduce the output of the Heater itself.


With regard to the analogy of a Cruise Control on a car, it is a "PID Controller" that many people are already familiar with. The Cruise Controller on a car operates in exactly the same manner as the PID Controller used to control temperature in a Brew Fridge ...


... but the only thing a car driver can generally adjust is the Set Point for the Speed; everything else (P,I&D) being set by the manufacturer. :thumb:


[emoji6]


Sent from my iPad using Tapatalk
 
Thanks for all the help and tips everyone. Some great info and explanations. Really interesting stuff. Been reading over this the last few days trying to get my head around it so time to get it out from the garage and see if i can get it working again. From what i read above its not good to run autotune from heat up to the very start am i correct? Am i better off starting the autotune somewhere close to the temperature i will be working at?
Also how exactly do the Inkbird M50, P and t correspond to PID. I mean i know "M50" (Integral time) = Integral and i presume "P" (Differential) is Proportional and "t" (Hysteresis time) is Derivative?
 
AAAAaaaaaagggghhhh! :doh: :doh:

I was hoping no-one was going to mention "Hysteresis"! :lol: :lol:

I'll get back to you on that one after I've completed my third PhD! :thumb:

Until then "Yes" start the Autotune when you are more or less where you want to be..

If you then wish to make ANY changes:

1. Write down EVERY setting before you start.

2. Select the ONE parameter you intend to change.

3. Make a single VERY SMALL adjustment to that parameter.

4. Write down what happens as a result of the change to the parameter after a suitable length of time. (*)

If what you did had no measurable effect (or had a negative effect) return everything back to its original position and start again.

This time either select a different parameter to change or decide on a slightly larger change to the same parameter. Either way be patient.

Note:

(*) A "suitable length of time" may be as long as a full 24 hours or as short as a few seconds.

Enjoy! :thumb:
 

Latest posts

Back
Top