NB's bunker brewery build

The Homebrew Forum

Help Support The Homebrew Forum:

This site may earn a commission from merchant affiliate links, including eBay, Amazon, and others.
Hope it's all working fine. Looks really good. Maybe I will persist with the DIN plug/sockets as it seems logical to be able to disconnect the sensors from the control box rather than the HLT.
 
I've been getting some weird readings from my rex c100s. Tell me if you notice the same thing...

I'll set the SV to something like 66 and it will heat the water up to that level and the display will read as if it is holding a steady temp.
Then I'll change the SV and instantly the PV temperature reading will change dramatically.

I have no idea what is going on here.
 
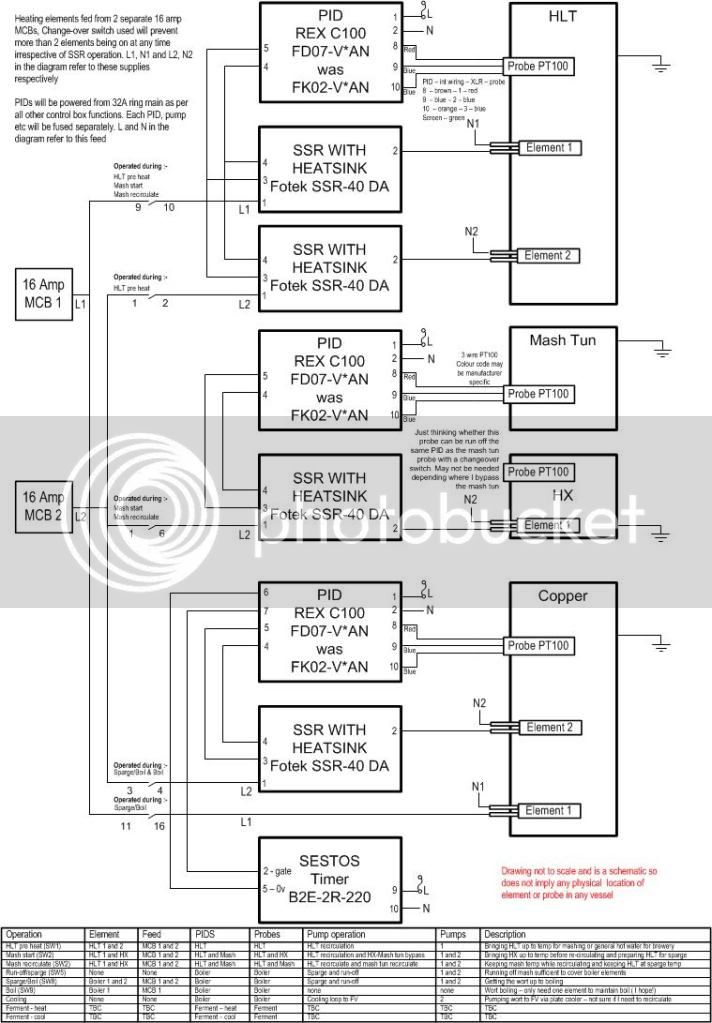
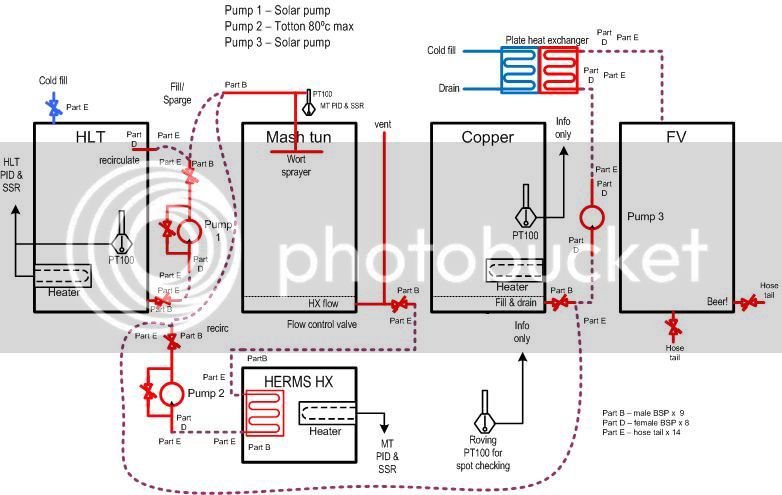
Thanks for the comments and encouragements guys! Finally managed to brew, however it was nip and tuck and I had to cut a few corners and made a few mistakes. As I had a couple of mates over for a brew weekend then the pressure was on to do more than just commission the brewery but to make some beer too. Here's the schematic of the brewery that we tried to commission, we ended up doing most of this except the recirc on the HLT to avoid stratification, the spoon was used for this and I may stick with it.

HERMSschematics-overview.jpg


Here's the wiring diagram for the elements and control box in general. Worked a treat, only one polarity error on the PIDs that was quickly spotted and fixed and everything else worked, all 5 PIDS and probes, all 4 SSRs and all 5 elements. The big rotary switch that prevents more than 2 elements being turned on simultaneosuly also worked fine. I haven't wired in the mains LEDs to show which elements are receiving power yet however I haven't intergrated pump control yet and that is the next step. We used extension leads and and various heath robinson floating connectors (sometimes literally ;) ) for the pumps and I need to get this sorted for next time.

HERMSschematics-elementwiring.jpg


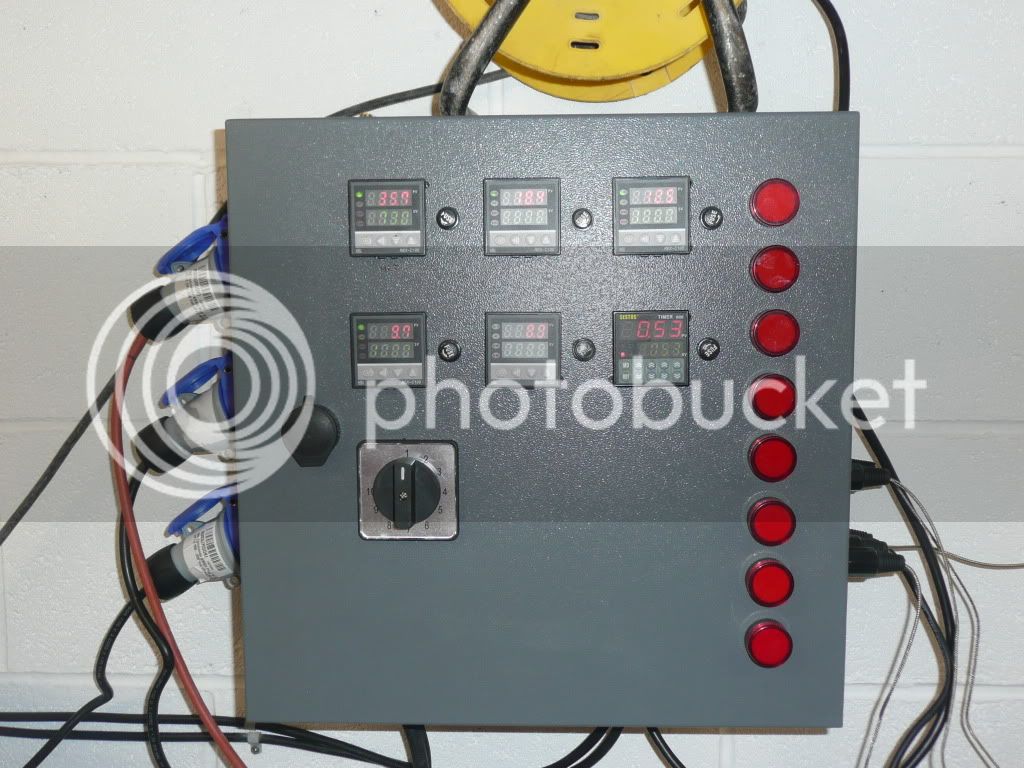
Here's the quiet before the storm, control box on the wall but no vessels in. I completed the wiring for the 2 x 15 amp supllies for the elements back to MCB on the consumer unit but the PIDs etc. in the control box are using an extension lead as I haven't completed the ring main.

P1020375.jpg


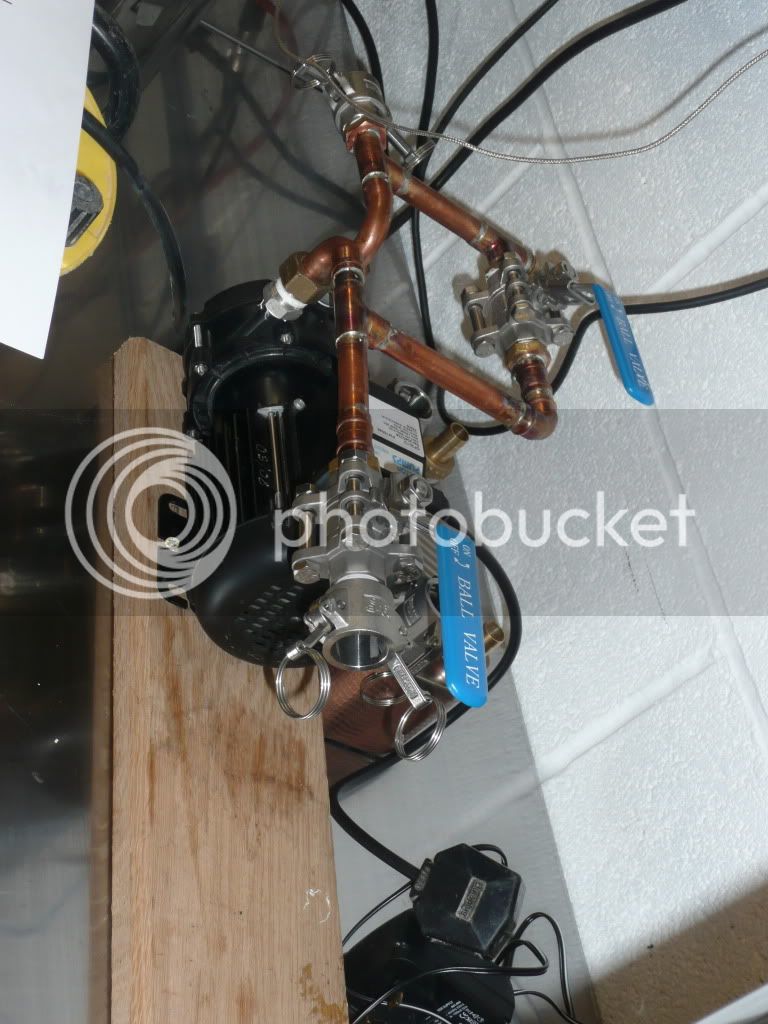
Here's the pump bypass assembly, possible room for improvement here. The timber the Totton pump stands on is temporary. I put a 15mm air bleed valve in the end of one of the tees which worked well to prime the pump, found the pump was very sensitive to a bit of air in the pipes and needed frequent bleeding when swapping pipes or I stood on a hose. For this first brew I got away with the Totton pump with bypass and a solar pump without. Need to complete a bypass on my other solar pump and buy some more silicon hose. Camlock connectors worked well but the rings on the end of the arms can be annoying.

P1020399.jpg


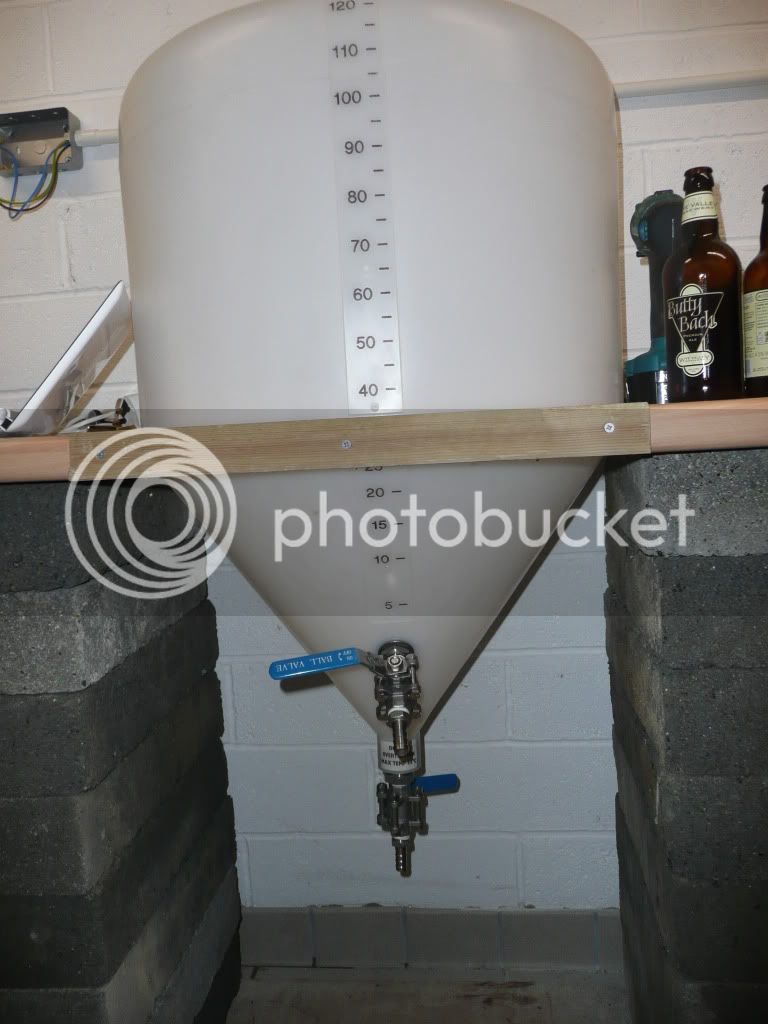
Here's the temporary FV stand - will be building an insulated stand/cupboard for the next brew. This brew is using a submerged 50W SS aquarium heater set to 20c and a large duvet, the ambient temp in the brewery is 12c and the temp in the FV before the duvet went on was 17c so I think we will get away with it this time.

P1020402.jpg


Here's the control box turned on and working - the extension lead is temporary. Haven't really got to grips with the timer yet except changing the display from milli-seconds to seconds.

P1020403.jpg


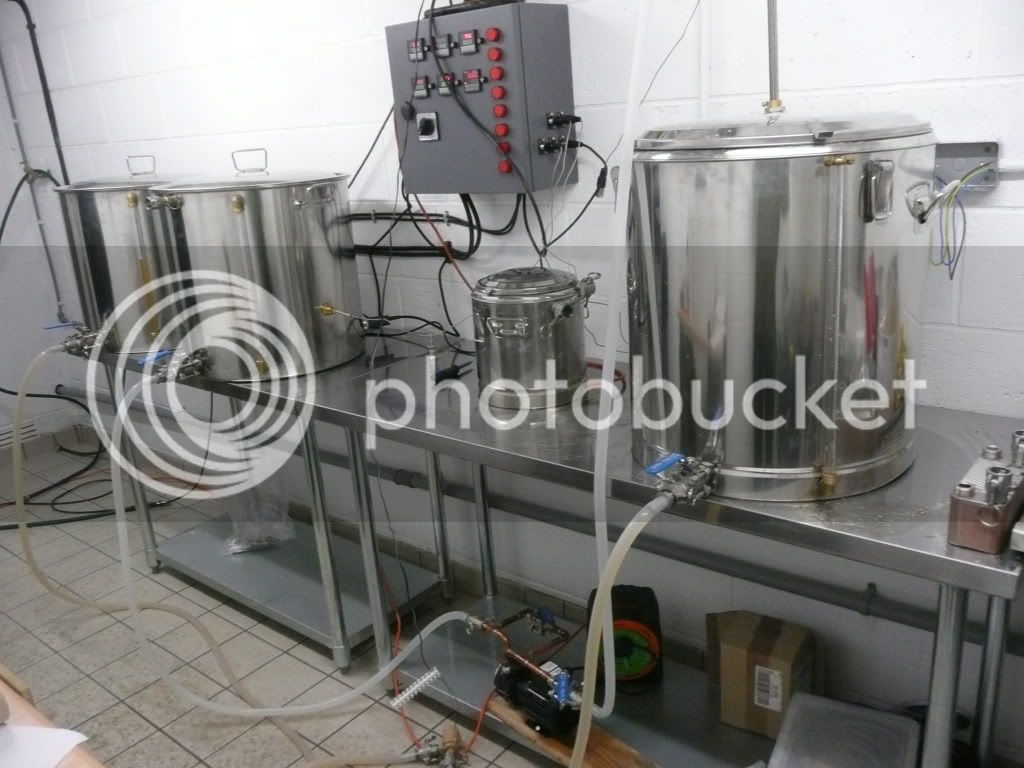
Here's the brewery with all the pots and pumps.

P1020404.jpg


Problems :-

1.) Not enough silicon pipe - need another 9m. Suffered from kinked garden hose syndrome on the plate HX water output.
2.) Wort sprayer seemed to dribble rather than spray at sparge/recirc flow rates. However I did not calibrate the flow exactly so may just need tuning. (using a brass version of a wort aerator)
3.) Plate heat exchange wort output was about 27c. had to liquor back so problem solved for this brew - may need a bigger or another HX.
4.) Spent zero time sanity checking the recipe and ended up with 80L of 1066 OG after liquoring back from 60L. In retrospect this was pretty obvious however my objective was to get a working brewery and some ale to tide me over until I get more time to do a proper job.
5.) Something to hold the plate heat exchanger in place, nearly fell onto the floor on several occasions.
6.) ceramic airstone received in lieu of the SS one wasn't 1/4" fitting - never noticed until I needed it.

Must do better next time

1.) Calibration of dead space and recirc flow rates
2.) Cleaning/sanitation routine - currently none existent. Will have to go back into the brewery and give it a good clean today and clean all the pots again.
3.) Clean buckets for spillages, cleaning and draining, buy a mop before SWMBO complains and some proper containers for large quantities of grain, both for storage and for doughing in
4.) Need to wall mount the 5L container full of RO water and starsan so its easy to dispense. Also get a spray bottle.
5.) Pay attention to the recipe a bit more!

Next steps

1.) build a FV stand/cupboard
2.) get regulators and gas for 2 x cornies
3.) Finish off pump holders and insulate all vessels
4.) Add hooks to wall to hang pipes on when not in use
5.) finish off ring main
6.) complete vent/extractor system for copper.

Cheers NB
 
dennisdk2000 said:
Just a thought - if you need more resistance in the sight glass, maybe a compression stop end with a small hole drilled through the centre fitted to the top end of the sight glass might work?

Dennis

Hi Dennis. It seemed to work fine, only issue is when you turn the pump off the wort shoots up and sometimes flows over the top of the sight tube. :hmm:

I need to calibrate the recirc properly then give it another go to make sure.

Cheers
NB
 
Andy if you cap the sight tube till your pump gets the mash recirculating you will find the liquor will not spurt out everywhere. We had similar problem and now use a 15mm end cap on the top of the silicone tube. just till the pump gets going. We have a piece of pipe just after the mash tun tap for monitoring wort temp during mash.
 
mark1964 said:
Andy if you cap the sight tube till your pump gets the mash recirculating you will find the liquor will not spurt out everywhere. We had similar problem and now use a 15mm end cap on the top of the silicone tube. just till the pump gets going. We have a piece of pipe just after the mash tun tap for monitoring wort temp during mash.

I'll have a look into that Mark - a small brass tap may be in order and/or I may use this as an entry point for a mash tun temp probe. :hmm:
 
Darcey said:
:shock:

I think I need to pay more attention to my brewery build.... :oops:

Hi Darcy
I need to pay more attention to my recipes and I'm not very adventurous. Looks like you have this nailed :thumb:
Now I have the shiny kit I have absolutely no excuses :whistle:

I've never heard of most of the beer types you brew!
Stopfordian Blonde, Chinook Kolsch Redux, Triple Hop Kolsch - what are they :wha:
 
NB are those pots the 100L ones from nordic and that mash tun the 80L themo pot?

Lots like a very nice brewery build and also the plate chiller where did you get that?
 
Devonhomebrew said:
NB are those pots the 100L ones from nordic and that mash tun the 80L themo pot?

Yes they are, the HERMS HX is the 6L thermo pot

Devonhomebrew said:
Lots like a very nice brewery build and also the plate chiller where did you get that?

Thanks Devon - I bought the plate heat exchanger here

It's a 30 plate 66kW unit, having tested it I wish I had gone for 40 plates. It cooled down to 28c last time however it is spring so in summer it probably will not be as efficient. I may be able to slow the wort flow as I did pump it through quite quickly.
 
graysalchemy said:
Something Like this clicky

Yes 165kW compared top 66kW - that should do it, however there's a law of diminishing returns here as the cooling water gets hot. May be better to get two smaller ones each with their own cold water supply and pipe them in series for the wort - if you have enough cold water flow. I'm going to try it with a slower wort feed next time to see if it gets it down a few more degrees.
 
Northern Brewer said:
Darcey said:
:shock:
I think I need to pay more attention to my brewery build.... :oops:

Hi Darcy
I need to pay more attention to my recipes and I'm not very adventurous. Looks like you have this nailed :thumb:
Now I have the shiny kit I have absolutely no excuses :whistle:

I've never heard of most of the beer types you brew!
Stopfordian Blonde, Chinook Kolsch Redux, Triple Hop Kolsch - what are they :wha:

Your only as good as your last brew.. and ive had to bin the last 10g due to infection! I only brew 5g at a time and normally 4 times a month so I get lots of practice in. Also have alot of happy mates :drunk:

When ever I have a problem brew that didnt come out correct I always have another stab at them and such beers are always named Redux. I love trying different yeasts with similar hops/grain bills so they just get named after the yeast or where its famously from Kolsch is the Cologne pseudo lager type beer that can be much better than a lager (IMO). Stopfordian Blonde is a take on Lancaster Brewerys Blonde using their (Thwaites Yeast) but using the hop scheudal from Robbinsons Brewery here in Stockport (a Stopfordian is an inhabitant of Stockport).


http://www.thehomebrewforum.co.uk/viewtopic.php?f=13&t=18620&hilit=+build
I still am using the kitchen when I have a now tanked painted, new floored cellar to brew in... I have all the kit to make a basic control box but things just keep getting in the way!! Thus must make more time for brewery building you are in inspiration :D !

D
 
Not looked in on the build for a while, looks a fantastic job, congratulations :thumb:
 
Darcy said:
a Stopfordian is an inhabitant of Stockport

I'm originally from New Mills near Stockport so maybe I'm an honourary Stopfordian :?:

Darcy said:
Your only as good as your last brew.. and ive had to bin the last 10g due to infection!

I nearly lost my first brew from the shiny kit to infection, there is still a chance I will although it curently smells fine :pray: The wort temp dropped to about 12c, even with a duvet and 50W aquarian pump, so I have had a fan heater in there for nearly a week at great expense. Took at least 3 days for a decent yeast creuzen to appear. Lesson learned here is to make sure you have a FV cupboard ready if the ambient temp in your brew room is low and don't be tempted to brew until you do. FV cupboard design is now under way, will make it so I can take out the FV and put in shelves for bottles/cornies for secondary fermentation.

I'm just getting the kit together to harvest different yeasts and to pay less for yeast for bigger brews....
Here's a PC fan with magnets from an old hard drive glued to the vanes. Not very neat, the hot glue gun has a mind of its own! Will make this into a stir plate as per the forum howto

P1020444.jpg
 
Baz Chaz said:
Not looked in on the build for a while, looks a fantastic job, congratulations :thumb:

Thanks BC - much more to do yet, which is good as I'm enjoying building it as much as brewing and nearly as much as drinking :cheers:
 

Latest posts

Back
Top