Yeast slurry

The Homebrew Forum

Help Support The Homebrew Forum:

This site may earn a commission from merchant affiliate links, including eBay, Amazon, and others.
I've hedged my bets - just made a starter wort with a pint of water and 4 tablespoons dme. Poured off most of the clear liquid from the yeast I harvested from the last brew, and added what was left to the wort. It's sitting merrily on my starter plate, where I shall leave it spinning until tomorrow morning. Hopefully it'll be ready for the next brew on Wednesday evening.....
 
Reckon it'll be fine

However...

I know you were pleased with your stir plate when you made it and we even talked about you making me one, but have a look at this. It's written by the same kwnowledgable guy who states that keeping your yeast under water is wrong.

http://www.jimsbeerkit.co.uk/forum/viewtopic.php?f=12&t=70926

"Contrary to what most home brewers have been led to believe, stir plates were not designed to aerate cultures. They were designed to keep cells from multi-cellular eukaryotes (yeast cells are single-cell eukaryotes) from clumping during a laboratory process known as suspension cell culturing. FLO is the name for the set of genes that control flocculation in yeast. Most brewing yeast strains are NewFlo strains, which means that they naturally remain in suspension until mannose, glucose, maltose, sucrose, and maltotriose have been reduced to a genetically set level; hence, starters do not need to be stirred to keep the viable yeast cells in suspension. Additionally, spinning a starter fast enough to aerate the medium during the lag phase causes the yeast cells to experience shear stress, which is why stirred starters often smell and taste foul".
 
Interesting read. What amazes me is the differing advice you get from t'interweb! I'll stick with the stirplate for this one (I made it - by damn I'm going to use it!), and try his method for the next and see if I can detect any difference.
 
Interesting read. What amazes me is the differing advice you get from t'interweb! I'll stick with the stirplate for this one (I made it - by damn I'm going to use it!), and try his method for the next and see if I can detect any difference.


Yeah, I'd stick with the stir plate if I was you. If it works for you stick with it, I say. In a similar way I intend to continue rinsing my yeast with water, until I find a effective way to use beer, as It works well for me.

I think with these things (stir plates, rinsing with water and indeed sprinking dried yeast as opposed to re-hydrating it) there's best practice/scientifically sound and 'wrong but still works well'.

I came acrose the shaken not stirred method as it was mentioned in the thread clibit posted about keeping your yeast under beer. As I have cultured up yeast from bottles using a similar 'shaking in a bottle' method I was curious as to finding out what this 'shaken not stirred' method was.
 
I am re-using US 05 from a pale ale I bottled 2 days ago. Most guys post a picture of a glass or bottle of their first brew. This is #58 and it's a 250ml lemonade PET bottle of mainly break material, plus green beer and, hopefully US 05 yeast

IMG_3168.jpg
 
I am re-using US 05 from a pale ale I bottled 2 days ago. Most guys post a picture of a glass or bottle of their first brew. This is #58 and it's a 250ml lemonade PET bottle of mainly break material, plus green beer and, hopefully US 05 yeast

What are you planning to do with it? Rinse it or pitch some trub
 
There's a bit in the book 'Yeast' about estimating the quantity of yeast. Basically it involves repeated dilution until the liquid is clear, when it is clear it contains x cells per ml (can't remember the number) and you then multiply back.
 
What are you planning to do with it? Rinse it or pitch some trub

Not clear at this stage what is yeast, what is trub and what is break material, although the green beer looks actually quite appealing.

Plan is simple, chuck the lot in at first, then think of a better plan next time. I pitched the first of these yesterday, as was, but left the bit at the bottom. There are 10 more in the fridge, because I got a bit carried away.

Anyway, batch 1 has been added to a Coopers English Bitter, plus a mini-mash with Challenger and a hop called Multihead at flameout.

This plan, less the protien trub from the mash, worked OK last time around. So will see how it goes.

If any of the little bottles smell "off", they get ditched.
 
Yeah, I'd stick with the stir plate if I was you. If it works for you stick with it, I say. In a similar way I intend to continue rinsing my yeast with water, until I find a effective way to use beer, as It works well for me.

I think with these things (stir plates, rinsing with water and indeed sprinking dried yeast as opposed to re-hydrating it) there's best practice/scientifically sound and 'wrong but still works well'.

I came acrose the shaken not stirred method as it was mentioned in the thread clibit posted about keeping your yeast under beer. As I have cultured up yeast from bottles using a similar 'shaking in a bottle' method I was curious as to finding out what this 'shaken not stirred' method was.

Back in the lab, we used to culture yeast using a shaker, not a stirrer. The stirrer was used to prepare solutions of difficult to dissolve compounds. That said, I do use a homemade stirrer (PC fan, magnets...), but I've never seen any benefit of trying to create an Atlantic size whirlpool in a yeast starter flask. A little agitation is all that's needed.
 
I came across 'shaking' last winter when I wanted to culture up some yeast from a bottle. I couldn't afford a stir plate and certainly didn't trust myself to make one without risking burning down the house in a massive electrical fire - seems I was doing the right thing without even knowing it instead of just being tight.

Here's the you tube vid I followed to culture up the yeast

https://youtu.be/2UGJ_b-MfbE
 
Not clear at this stage what is yeast, what is trub and what is break material, although the green beer looks actually quite appealing.

Plan is simple, chuck the lot in at first, then think of a better plan next time. I pitched the first of these yesterday, as was, but left the bit at the bottom. There are 10 more in the fridge, because I got a bit carried away.

Anyway, batch 1 has been added to a Coopers English Bitter, plus a mini-mash with Challenger and a hop called Multihead at flameout.

This plan, less the protien trub from the mash, worked OK last time around. So will see how it goes.

If any of the little bottles smell "off", they get ditched.

Slid, I'm thinking of doing the same this Saturday coming, it'll be my first time reusing yeast so it'd be very much appreciated if you can keep us updated with how it goes.
 
Slid, I'm thinking of doing the same this Saturday coming, it'll be my first time reusing yeast so it'd be very much appreciated if you can keep us updated with how it goes.

Have you got star san? Make sure you spray EVERYTHING! I spray the lid and all around it before opening the jar/bottle. Once opened I spray the lip of the bottle/jar that it's going to be poured over.
 
I think I've finally worked out how to store my yeast under beer. The trick is not to try and somehow rinse the yeast out of the trub using beer but to make starters and split them, and then keep the yeast under beer the DME starter 'beer'.

I really like the look of this method.

http://uk-homebrew.tripod.com/id45.html

For those of you who can't be bothered to read the whole link, basically you make a 'beer' with DME only, no hops, of 4.5L brew length with your chosen yeast. Once it has fermented out in the FV, swirl the grown yeast that will have settled out into suspension then bottle like you would a normal beer. You then end up with several bottles of yeast under beer. You then can make up a new starter with one bottle to pitch into a batch of beer

Obviously having several bottles of 'starter yeast' in your fridge can take up a lot of room so I intend to decant most of the DME 'beer' off and store the starter yeast in some centrifuge vials I've got
 
[FONT=&quot]
The problem is aquiring the thin slurry as when you slosh the beer and trub about then leave it for 20 mins to settle out - it doesn't.

I post as YeastWhisperer over on JBK. A lot of people are confused [FONT=&quot]when it comes to using[/FONT] slurry pitching calculators. Slurry cropped from a conical is almost never pure yeast. It is a mixture of yeast cells, break, and small amounts of other organic matter. Roughly 40% to 60% of any given thick slurry is yeast. The remaining 40% to 60% is mostly break. At that ratio, one milliliter of slurry contains approximately 1.2 billion yeast cells[1] ; hence, 100ml of thick slurry contains approximately 120 billion yeast cells.

Additionally, yeast cultures are a little like nuclear weapons in that one does not have to be exact due to how yeast cells reproduce. A lot of brewers believe that yeast cultures grow linearly, that is, with [FONT=&quot]a[/FONT] starting yeast cell count of 50 billion cells and a replication period of 90 minutes, most brewers would assume that [FONT=&quot]the [/FONT]culture would contain 150 billion cells at 180 and 200 billion cells at [FONT=&quot]270 [/FONT]minutes. However, yeast cells reproduce by budding, that is, a cell basically splits into two yeast cells when it reproduces. This type of growth pattern is known as exponential or logarithmic growth; hence, the terms exponential phase and log phase are used to describe the phase where the yeast cell population grows to fit its new home.

The yeast cell population grows at a rate of 2^n, where the symbol "^" denotes raised to the power of, and the variable n equals the clock time in m[FONT=&quot]inutes[/FONT] that has elapsed in the log phase divided number of minutes in the replication period. This growth pattern means that the number of cells after 180 minutes of growth is 200 billion, not 150 billion. That number will double again to 400 billion at 270 minutes and 800 billion at 360 minutes if the carbon source (sugar is carbon bound to water) has not been depleted[FONT=&quot], the mother cells have not [/FONT][/FONT][FONT=&quot][FONT=&quot]depl[FONT=&quot]eted[/FONT][/FONT][/FONT][FONT=&quot][FONT=&quot][FONT=&quot] their er[FONT=&quot]gosterol and unsaturated fatty acid[FONT=&quot] reserves, and[/FONT][/FONT][/FONT][/FONT] the culture has not reached maximum cell density, which is approximately 200 billion cells per milliliter (4.6 trillion cells for 23 liters).

[FONT=&quot]number_of_ce[FONT=&quot]lls_af[FONT=&quot]ter_n_replica[FONT=&quot]tion_periods = initial_yeast[FONT=&quot]_cell_count [FONT=&quot]* 2^n, wh[FONT=&quot]ere n [FONT=&quot]equals [/FONT][/FONT][/FONT][/FONT][/FONT][/FONT][/FONT][/FONT][/FONT][FONT=&quot][FONT=&quot][FONT=&quot][FONT=&quot][FONT=&quot][FONT=&quot][FONT=&quot][FONT=&quot][FONT=&quot]ela[FONT=&quot]psed[/FONT][/FONT][/FONT][/FONT][/FONT][/FONT][/FONT][/FONT][/FONT][/FONT][FONT=&quot][FONT=&quot][FONT=&quot][FONT=&quot][FONT=&quot][FONT=&quot][FONT=&quot][FONT=&quot][FONT=&quot][FONT=&quot] time in[FONT=&quot] the log phase in min[FONT=&quot]utes d[FONT=&quot]i[FONT=&quot]vided by the replication period in minutes[/FONT][/FONT][/FONT][/FONT][/FONT][/FONT][/FONT][/FONT][/FONT][/FONT][/FONT][/FONT][/FONT]

Exponential growth is why yeast cultures are like nuclear weapons. The difference between a 100 billion cell culture and a 200 billion cell culture is roughly one [FONT=&quot]replication[/FONT] period (roughly 90 minutes of propagation time if metabolism is not slowed by cold temperatures); hence, there is no need to fret over a cell count difference that is less than 100 billion cells. Cell health is as important if not more important than actual cell count because given enough oxygen (O2) and carbon, a yeast culture will grow to fill its new home.[/FONT]

[FONT=&quot]My advice when pitching yeast is to pitch for desired performance. When pitching beers in the 1.048 range, I usually pitch between 3 and 10 billion cells per liter. The higher the yeast cell count, the less a yeast strain will exhibit its character. The lower the cell count, the more a yeast strain will exhibit its character. I pitch British strains in the 3 to 5 billion cells per liter range because I am not looking for an ester-free American-style fermentation. I want the yeast strain to express its unique signature. That extra replication period makes a difference in the final beer.

Finally, one does not slosh the fermentation vessel when cropping, one swirls the vessel. This action leads to the break and dead cells settling out quickly, leaving viable cells and the lightest break material in suspension. It takes practice to be able to decant the thin slurry from the heaviest matter when performing the operation with a 23L or larger fermentation vessel; therefore, it may benefit a brewer to swirl the sediment back into solution and decant the entire contents into a sanitized 1-gallon demijohn. After the transfer has been completed, the solids can be swirled again, and the thin slurry can be cropped after waiting a few minutes for the heaviest particulate matter to settle. One should only take the top 350 to 400 ml of thin slurry.[/FONT]
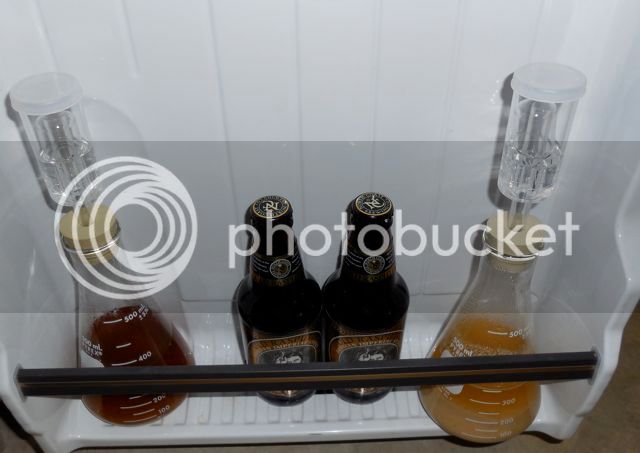
[FONT=&quot]Here's what a crop should look like:[/FONT]

[FONT=&quot]
YeastCrops_zps33da0025.jpg
[/FONT]

[FONT=&quot]Neither of the crops shown above were pure yeast, but both were highly effective when repitched. [FONT=&quot]Neither crop was rinsed with water.[/FONT][/FONT]
 
I am re-using US 05 from a pale ale I bottled 2 days ago. Most guys post a picture of a glass or bottle of their first brew. This is #58 and it's a 250ml lemonade PET bottle of mainly break material, plus green beer and, hopefully US 05 yeast

You would be surprised to discover how much yeast is in that bottle. Break is just easier to see with the naked eye unless the yeast and break layers are stratified.

I do not know if you currently do it, but it is easier to prevent break and other organic matter from entering one's fermentation vessel than it is to separate it from the yeast later. If you are using an immersion chiller and pelletized hops, all you need to do is too whirlpool the wort after chilling and wait for the break and hops to settle into a cone before racking out of your kettle into the fermentation vessel.

Additionally, any brewer who is serious about harvesting yeast should never attempt to transfer every drop of wort from his/her kettle to his/her fermentation vessel. One will notice that highly-experienced brewers create recipes that are larger than what they plan to package. For example, American brewers who plan to package 5 U.S. gallons (19L) of finished beer in a soda keg create recipes that produce 5.75 to 6.0 U.S. gallons of wort. The extra 0.75 to 1.0 US gallon is created to allow for kettle and primary fermentation vessel losses during transfers.
 
Back in the lab, we used to culture yeast using a shaker, not a stirrer. The stirrer was used to prepare solutions of difficult to dissolve compounds. That said, I do use a homemade stirrer (PC fan, magnets...), but I've never seen any benefit of trying to create an Atlantic size whirlpool in a yeast starter flask. A little agitation is all that's needed.

A shaker is the correct mechanical device to use when propagating yeast (White Labs has large orbital shaker table the lab where they propagate seed cultures). The rotational pattern that an orbital shaker creates causes the medium to slosh up onto the side of the flask, creating a larger surface area for O2 absorption. Additionally, a common practice when using a shaker table is to use a flask that is between 4 and 10 times larger than the volume of the medium being shaken. This practice also increases the amount of surface area because Erlenmeyer and Fernbach flasks are widest at that bottom.

My "Shaken, Not Stirred" method is based on the principle that wort in foam form has more surface area than wort in liquid form. The reason why the vessel should be at least four times the volume of the propagation medium when using my method is to allow for maximum expansion. Work is needed to transform a liquid into foam, which is why one needs to shake the starter like it owes one money (think mafia enforcer).

http://www.jimsbeerkit.co.uk/forum/viewtopic.php?f=12&t=70926

https://en.wikipedia.org/wiki/Foam
 
I had my first crack at re-pitching from the trub last Saturday to try and stretch my hot weather yeast. As MyQul said I went mega OCD on sterilising everything, I ran some beer into a bowl sealed it and put t to one side, when I'd finished bottling I put 6 tbsp' of trub into the bowl and mixed it with the beer and covered it and put it aside. When the wort was ready I gently stirred the bowl and into the FV it went. Twelve hours later the lid of the FV is bulging and the blow off tube is bubbling (Coopers Stout, mandatory blow off tube). So from now on I'll be re-pitching every second brew as it works so well and cuts my yeast cost in half, it's a win win. However as a contingency plan (I do love a contingency plan)when I came to that last bottle that fills with beer but mostly trub, I stopped filling shook up the FV and then filled the bottle with the beer/trub mix and stuck it in the fridge just in case plan A went south. My thinking now is that when I re-pitch I just fill that last bottle with beer/trub put the lid on and when the wort is ready, shake the bottle and pour it into the FV. The bottle is sterile, pre-prepared, easily sealed and stored, the sugar in the bottle won't hurt anything. It just seems the most convenient way to re-pitch from the trub.
 
A shaker is the correct mechanical device to use when propagating yeast (White Labs has large orbital shaker table the lab where they propagate seed cultures). The rotational pattern that an orbital shaker creates causes the medium to slosh up onto the side of the flask, creating a larger surface area for O2 absorption. Additionally, a common practice when using a shaker table is to use a flask that is between 4 and 10 times larger than the volume of the medium being shaken. This practice also increases the amount of surface area because Erlenmeyer and Fernbach flasks are widest at that bottom.

My "Shaken, Not Stirred" method is based on the principle that wort in foam form has more surface area than wort in liquid form. The reason why the vessel should be at least four times the volume of the propagation medium when using my method is to allow for maximum expansion. Work is needed to transform a liquid into foam, which is why one needs to shake the starter like it owes one money (think mafia enforcer).

http://www.jimsbeerkit.co.uk/forum/viewtopic.php?f=12&t=70926

https://en.wikipedia.org/wiki/Foam

Clearly I agree, but I should note that orbital shakers are not cheap and not as easy to make, as a stirrer, at home for the real Brewer. I use a homemade stirrer, because a little agitation works wonders. No offence meant, but I've been culturing yeast and other bugs for over 20 years. I couldn't give a toss what wikipedia and others say. A simple homemade stirrer is highly recommended for the home brewer, as far as I'm concerned. It's not essential, but it makes the whole starter process more efficient. If you are stepping up from a small yeast population it's a big time saver. If I start selling yeast (and you buy enough), I'd undercut white labs and wyeast, and buy an orbital shaker ;)
 
Clearly I agree, but I should note that orbital shakers are not cheap and not as easy to make, as a stirrer, at home for the real Brewer. I use a homemade stirrer, because a little agitation works wonders. No offence meant, but I've been culturing yeast and other bugs for over 20 years. I couldn't give a toss what wikipedia and others say. A simple homemade stirrer is highly recommended for the home brewer, as far as I'm concerned. It's not essential, but it makes the whole starter process more efficient. If you are stepping up from a small yeast population it's a big time saver. If I start selling yeast (and you buy enough), I'd undercut white labs and wyeast, and buy an orbital shaker ;)

I too have been culturing various brewing microflora for over twenty years. What started out as a necessity here in the U.S. during the bad old days of home brewing has turned into a labor of love, and a life-long pursuit of knowledge.

In reality, if one is pitching at high krausen, agitation is not really necessary with most flocculent Saccharomyces brewing strains because they exhibit NewFlo flocculation. NewFlo strains remain aggregate free until glucose, mannose, maltose, sucrose, and maltotriose have reach genetically set levels. Flo1 strains benefit from agitation, but NewFlo brewing strains out number Flo1 strains by a large margin.

What is necessary in batch propagation is ample dissolved oxygen (O2) during the lag phase. The best way to accomplish that goal is bubbling air or O2 through a diffusion stone, followed closely by shaking. Stir plates come in dead last in the O2 department.

I use my homemade stirrer at full speed for about 30 min to oxygenate starter wort. I never pitch at high krausen. I allow the yeast to finish, floc and build up their glycogen and trehalose reserves. Takes about 48 hours, from a 'fresh' liquid yeast vial, and about 24 hours for the yeast I manage myself. Then cold crash them until they are required. Some strains seem to take days to floc (e.g. WLP029) while others take minutes (e.g. WLP007). On brew day I decant the spent starter wort; bring the yeast up to room temperature and re-suspend them with a little beer wort, using the stirrer at low speed. Then pitch when they're fully resuspended/clump free. I get vigorous primary activity within 12 hours and completed primary fermentation within 3-5 days, depending on which yeast I'm using. If I have the space and time, and the yeast strain is highly flocculant, I'll use about 150mL of unwashed slurry to pitch another brew. Sometimes 2 :razz: I'll only do this once or twice, before prepping some fresh yeast.
 

Latest posts

Back
Top