


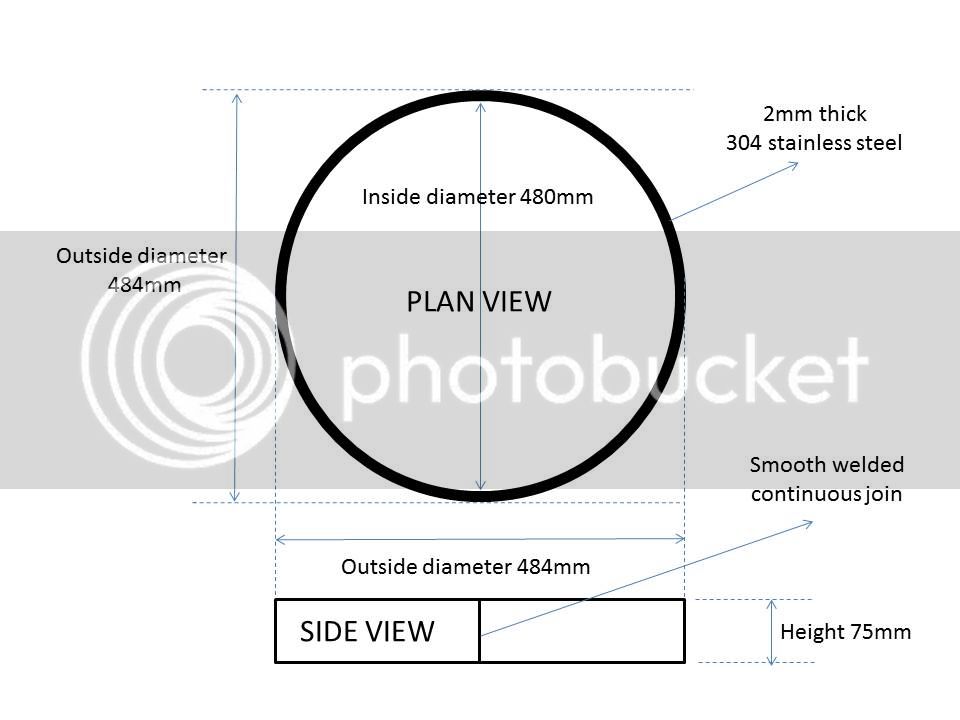
Now the Christmas break is over I have started work on the mash tun. Iâm using the usual Bergland thermopot and the size is 80L, which is bigger than I have used before, but more in keeping with my completed 100L HLT and proposed 100L boil kettle. All the thermopots I have converted in the past have been built using a fabricated SS 304 skirt or ring within the bottom rim of the pot and Iâve done the same this time. The SS skirt dimensions are 2mm thick with od of 484mm and 75mm high.
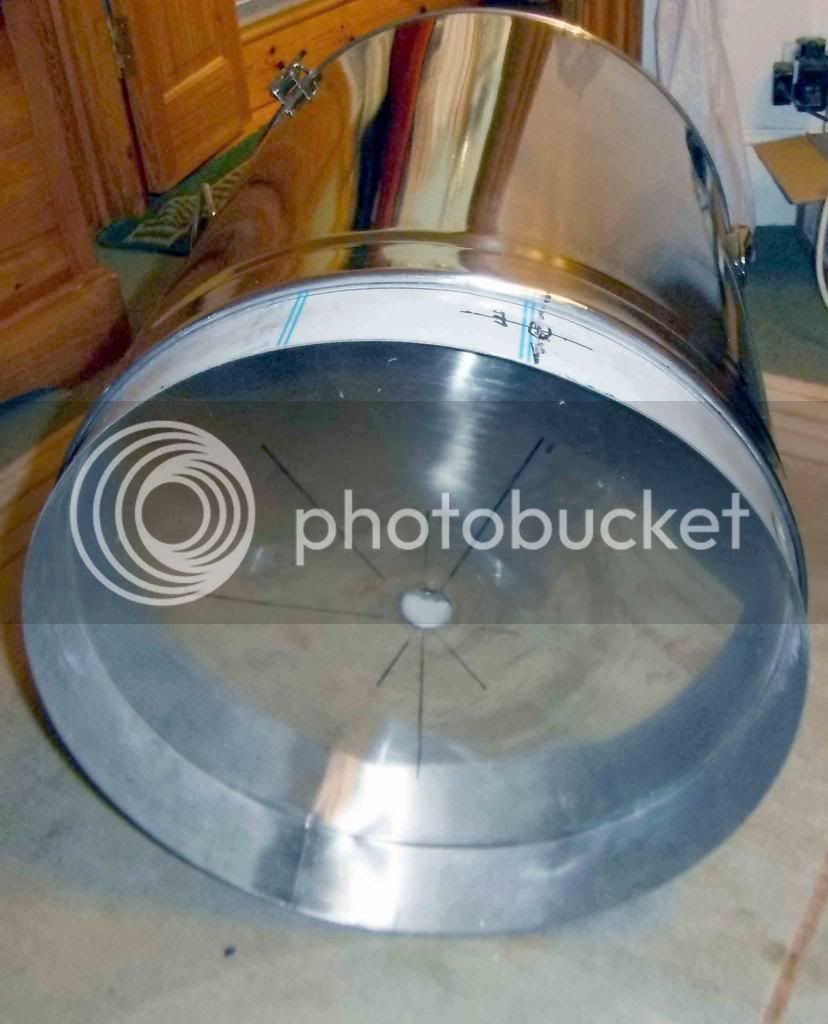
I prefer to use a skirt for the drain and ball valve pipe work as I think hacking slices out of the bottom of the thermopots to accommodate the drain fittings is a less desirable approach. The od of the skirt was deliberately chosen to be 1mm less than the exact id of the bottom rim of the thermopot. This means that, due to the manufacturing tolerances of the pot, the skirt initially doesnât fit! There is an element of flexibility in the stainless steel ring, so the thing to do is to fit as much in as you can â this is about two-thirds of the circumference â and then use a sash clamp to push the ring together and knock it into place with a rubber mallet. Once all the circumference of the ring is partially in, I went round the top of the ring with a club hammer and block of wood and knocked it firmly into position, making sure that the height was the same all the way around the pot and that the pot was level when on a flat surface. (When you invert the pot to do this banging make sure it is resting on a thick blanket and a sturdy work platform.) This way of fitting the skirt means that it is such a tight fit that no bolts or welding are needed to keep it in position. Itâs never going to move! Hereâs a picture of the skirt fitted and the drain hole drilled ready for the skin fitting drain:
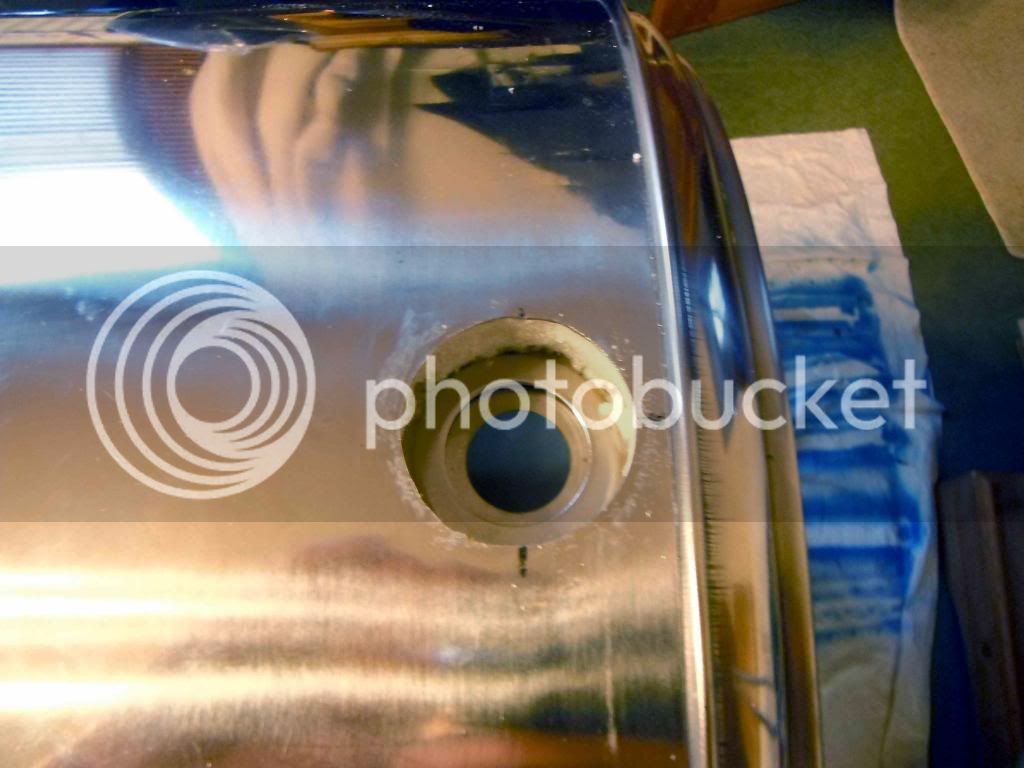
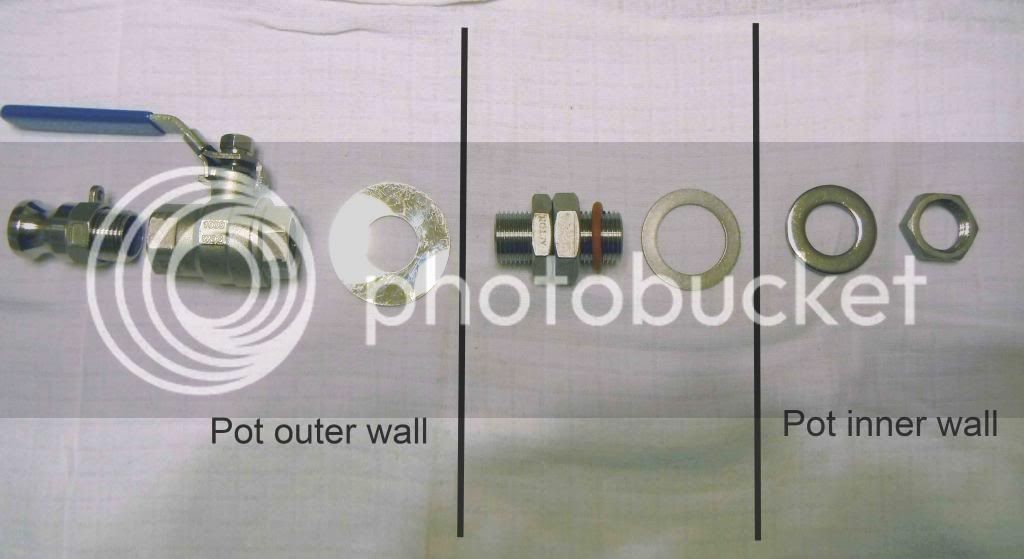
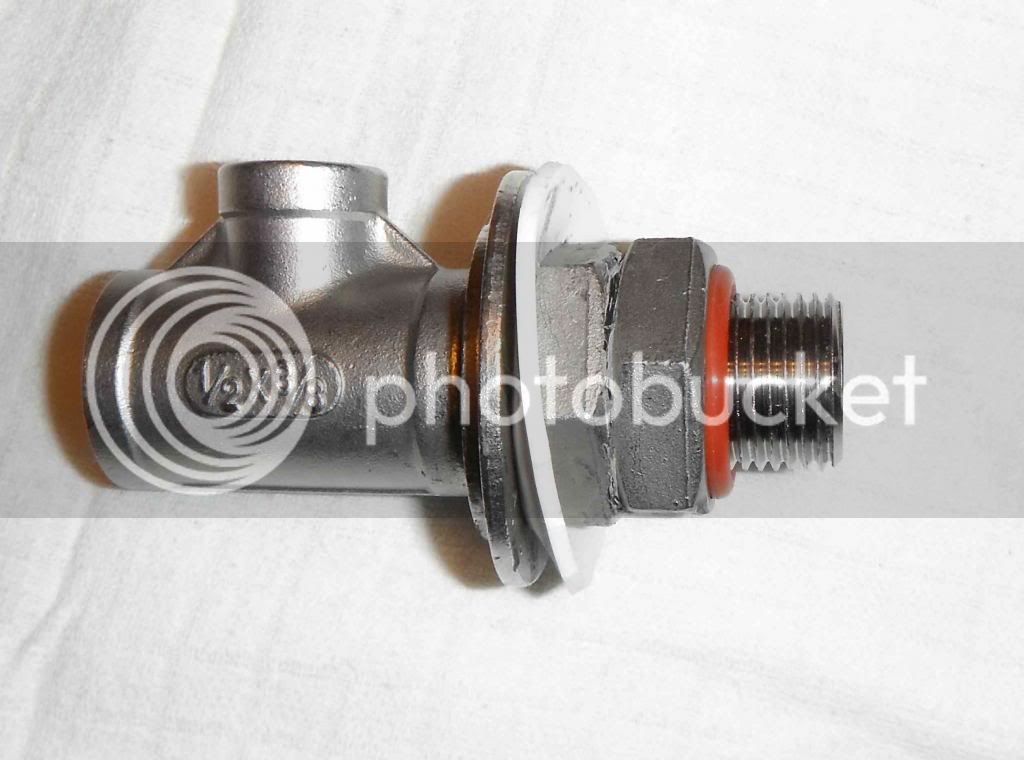
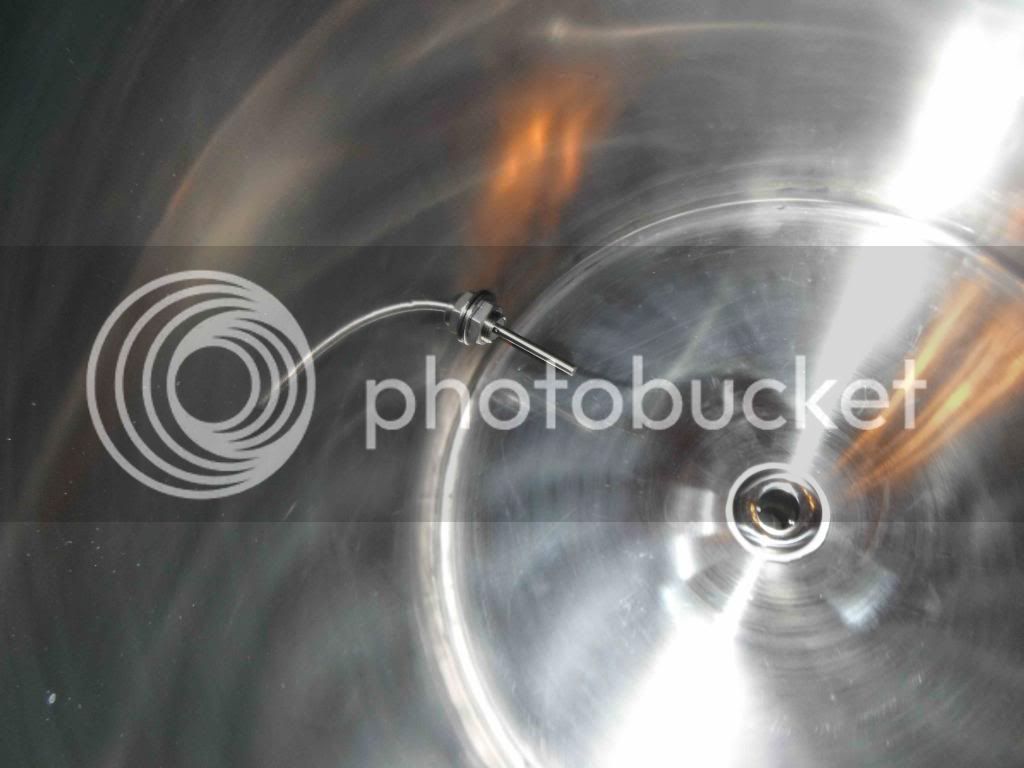
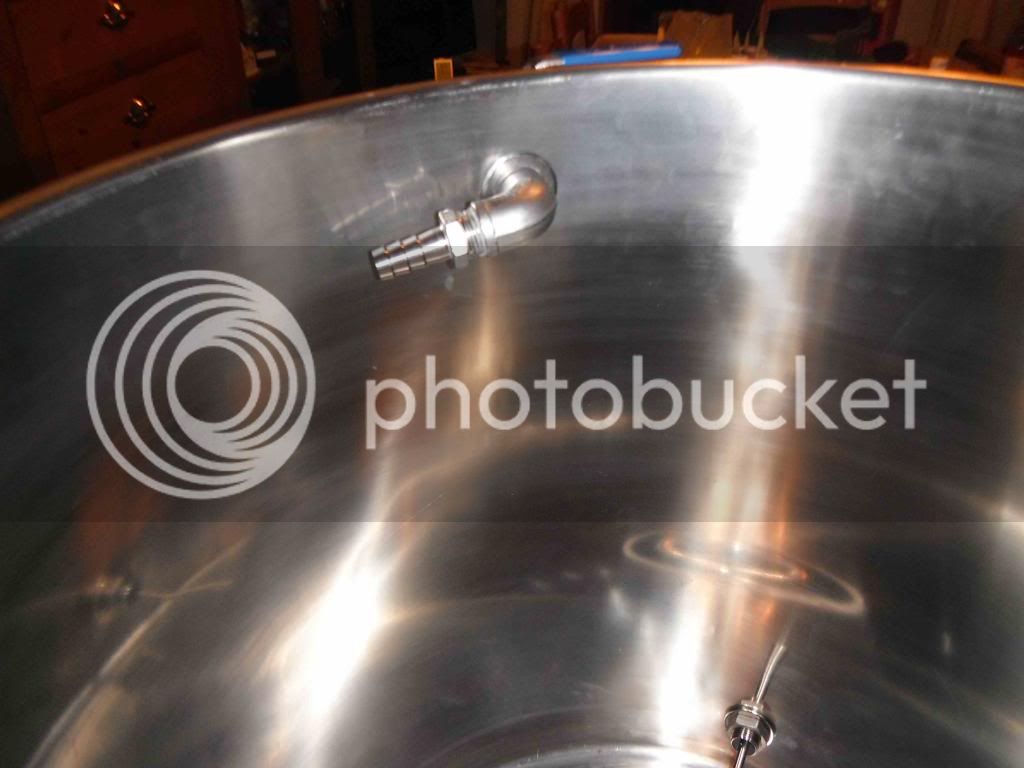
As I mentioned in earlier posts of My Electric Brewery construction, I am trying to emulate the design and set up of The Electric Brewery website, without the expense of buying the Blichmann Boilermaker kettles. The Boilermaker pot used as a mash tun in The Electric Brewery has a circulating ball valve, a dial thermometer, and a sight glass. But the Boilermaker is a single skinned vessel and these three items are difficult to fit through the double skin of the thermopot. However, it can be done and I will explain the way I have done it. The gap between the two walls of the thermopot is about 20mm. Two ½â BSP âOâ ring nuts from ebay (http://www.ebay.co.uk/itm/LOCKNUT-1-2-B ... 4ab69c74b7) have a combined back to back width of 19mm. A hole wide enough in the outer skin has to be drilled to take the 40mm shim that contains the expansion of the red silicone washer to make the weldless seal. To cover up this hole, a washer wider than the hole is needed. In this respect I had some washers custom made in 1.5mm thick 316 stainless which are 50mm od and 22mm id (http://www.lasermaster.co.uk/easy-order). When the assembled fitting is tightened up on the inside of the pot this large washer is pulled against the outside skin to form a neat finish and covers the hole. A homemade silicon washer behind the back of the large washer ensures a good seal. The large washer that covers the hole has to be bent into a very shallow âVâ to take account of the curvature of the pot. I did this by placing it into a vice at exactly the halfway point and giving it a few gentle taps with a hammer. The circulating ball valve and the dial thermometer were both fixed in this fashion. See pictures below:
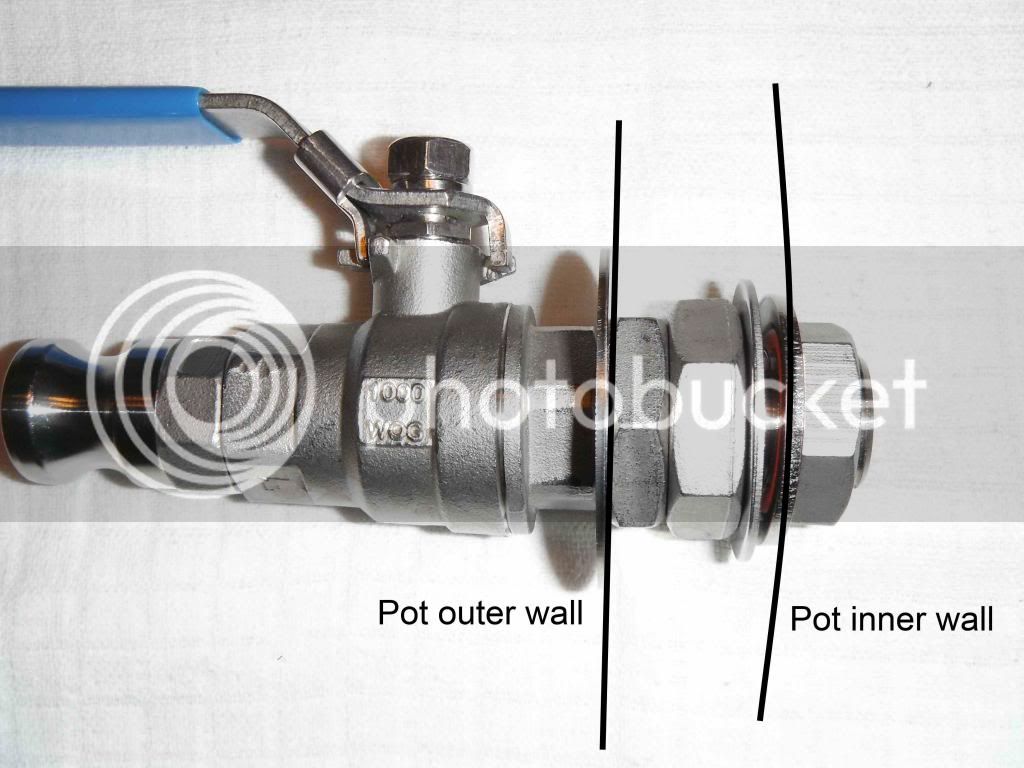

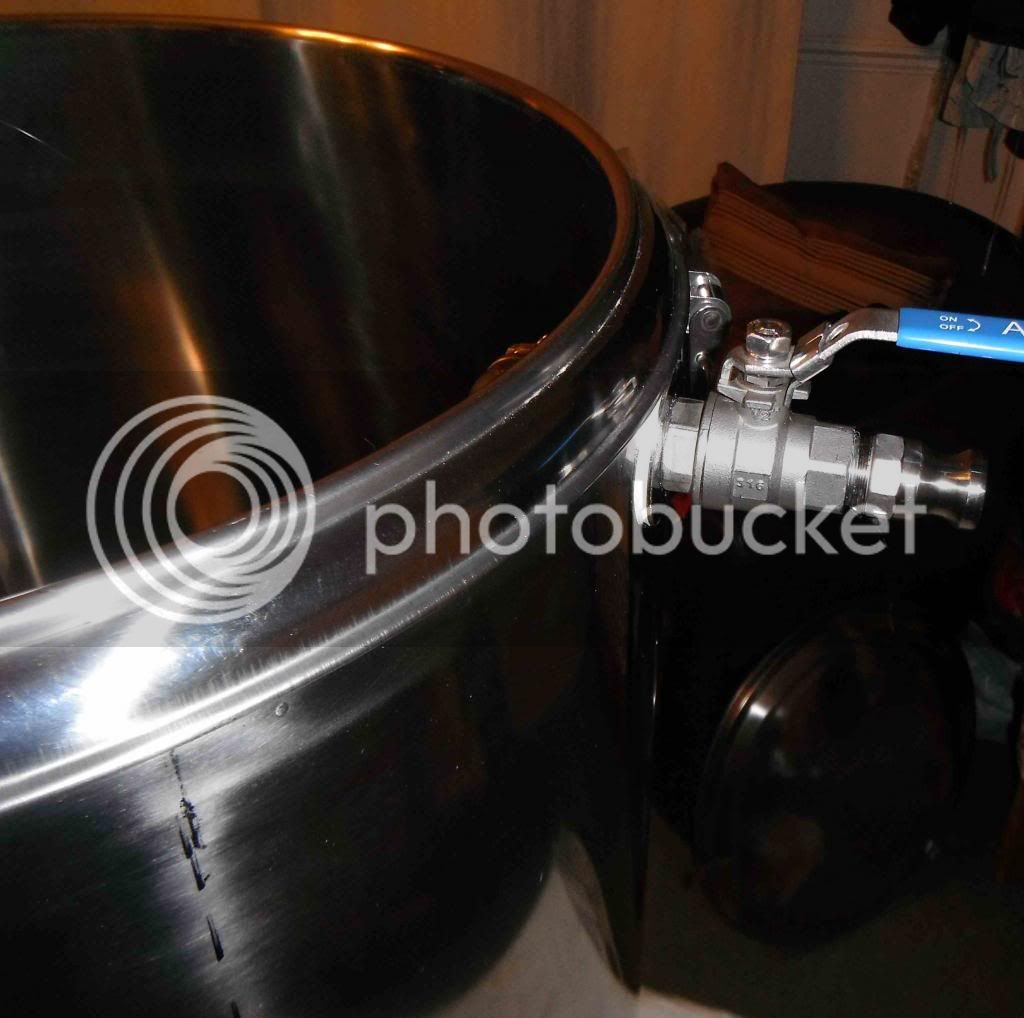
A 5ft sparge hose will be fitted to the circulating ball valve via an elbow and a hose tail.
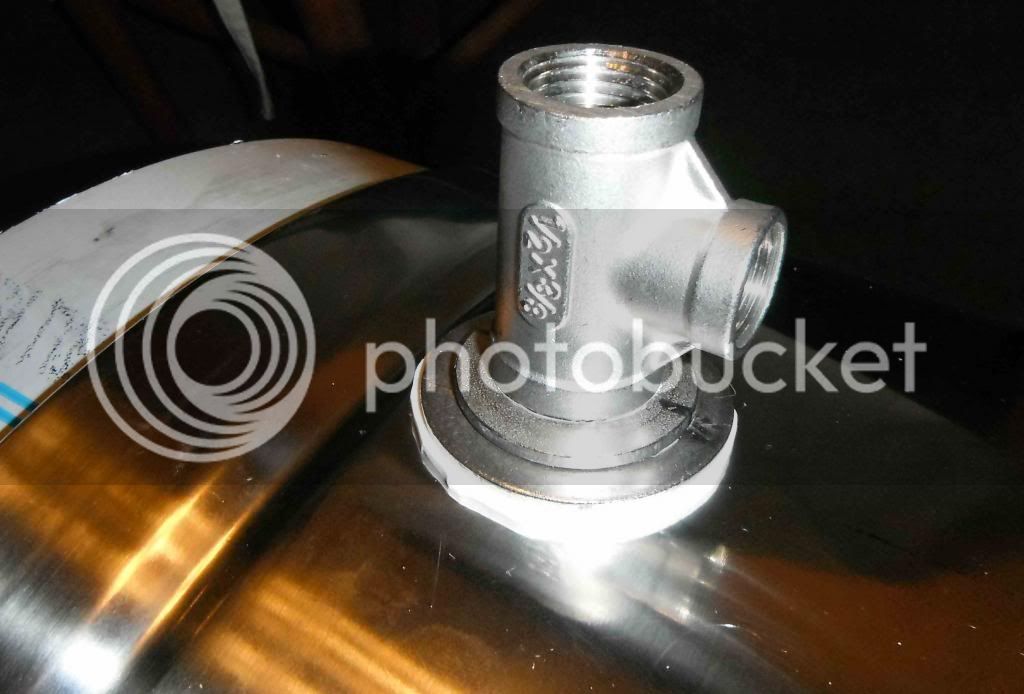
The lower end of the sight glass was fitted in the same weldless manner as the thermometer and recirculating ball valve. The sight glass will have a 3/8â BSP thread cut on it, and this mounts into a ½ x 3/8 x ½ Tee. A temperature probe will be fitted horizontally into the T piece to give an additional measuring point.
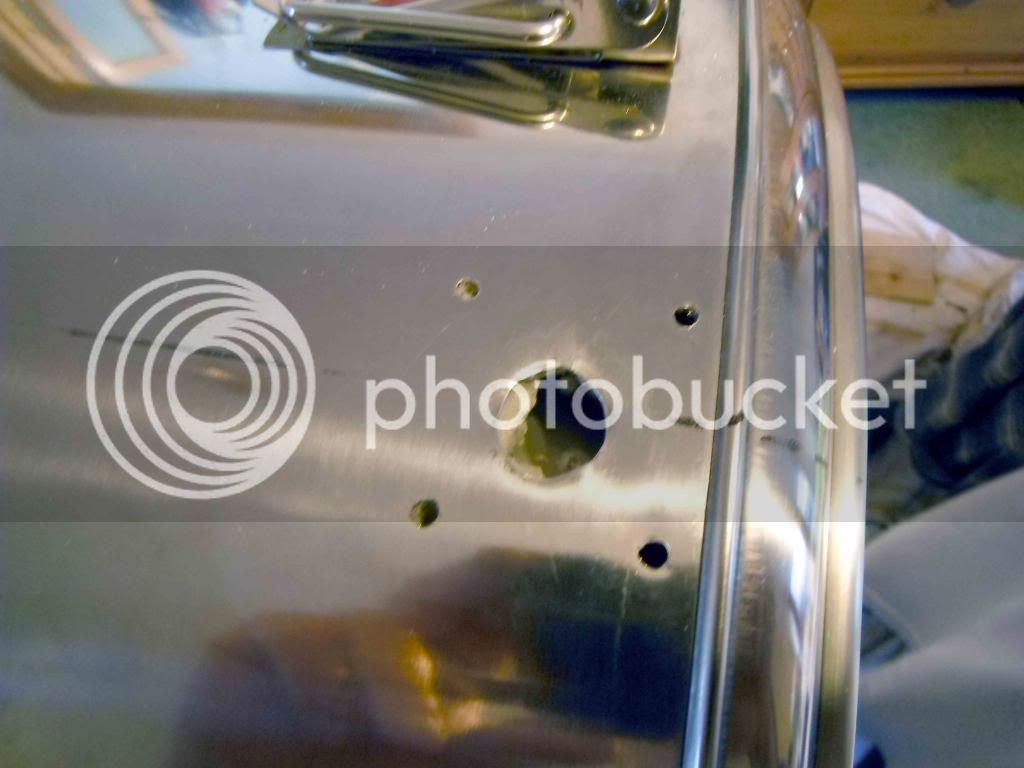
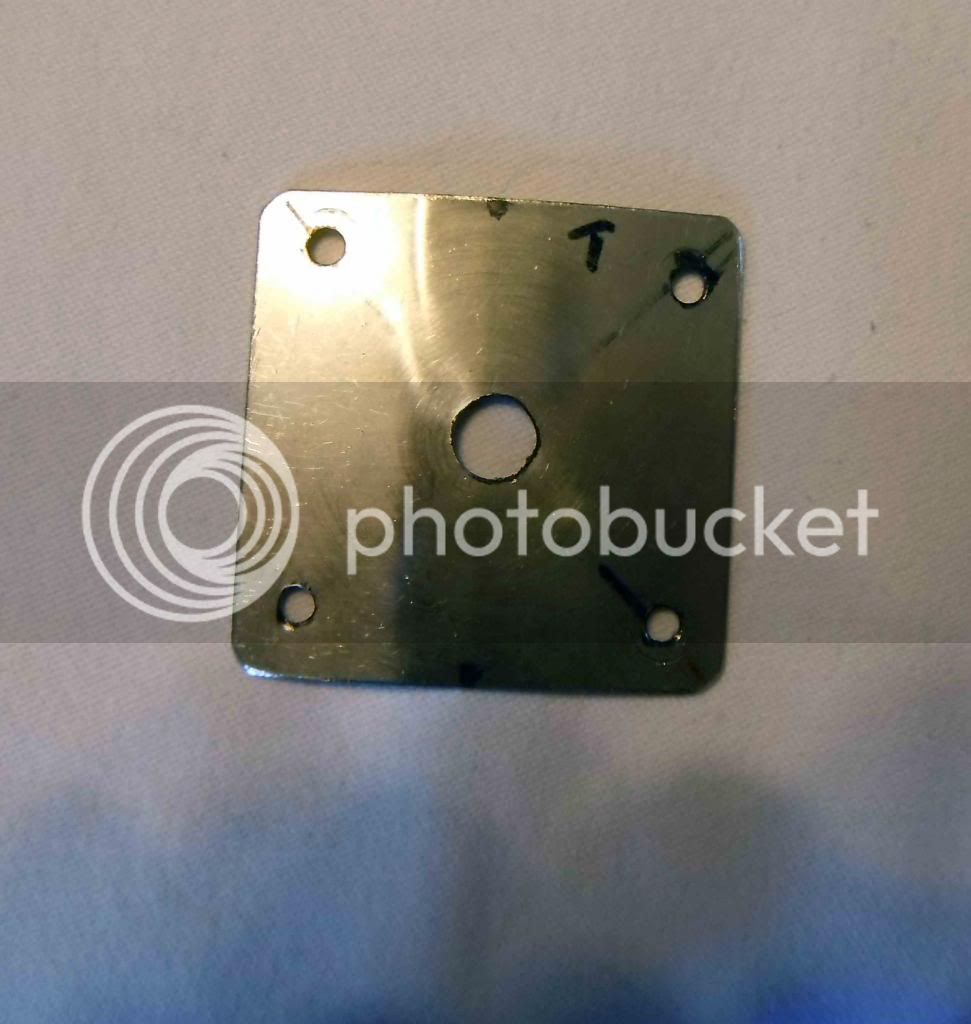
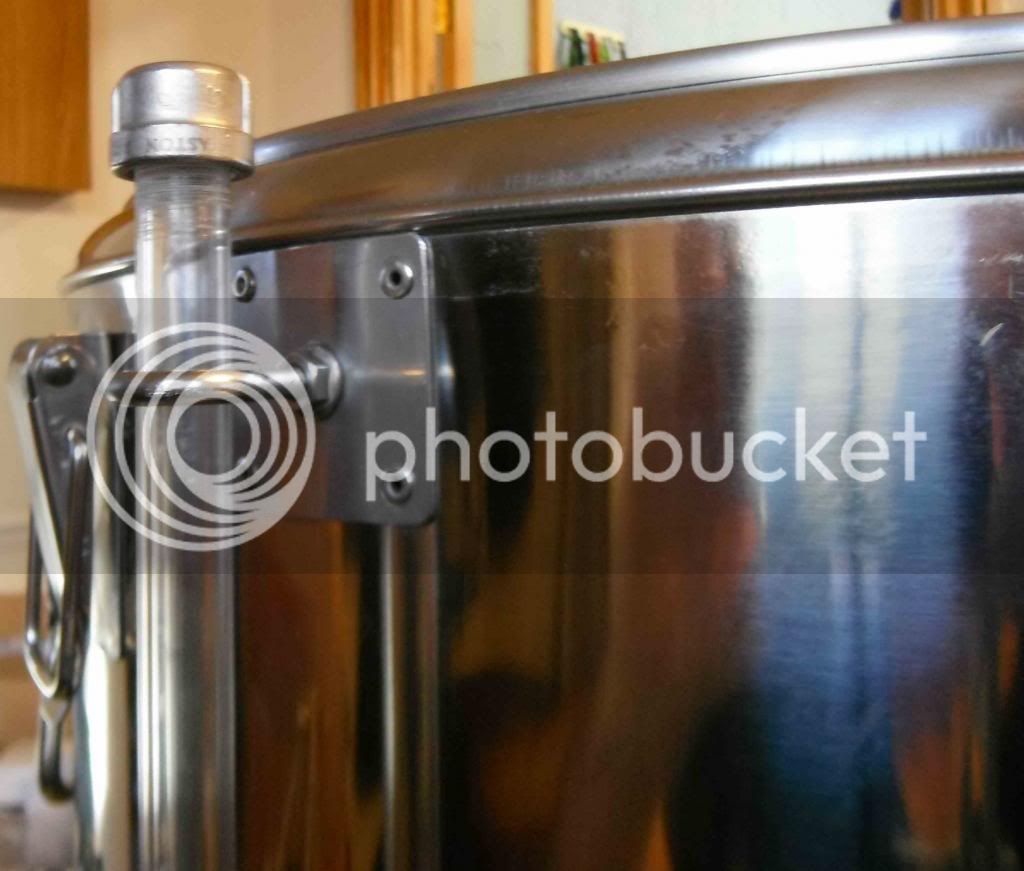
The top support for the sight glass is a M6 stainless steel eyebolt. The skin of the thermopot is less than 1mm thick and there is a danger that the bolt could easily pull through the thin skin. What I have done is to fit the bolt to a small plate of stainless steel, and then rivet the plate to the outer wall using stainless steel blind rivets. The plate was bent into a shallow curve to match the pot profile. The fixing doesnât penetrate the inner wall at all. Some JB Weld around the eyebolt fixing nuts, and along the edges of the plate before riveting, ensures a water tight seal and aids bonding.
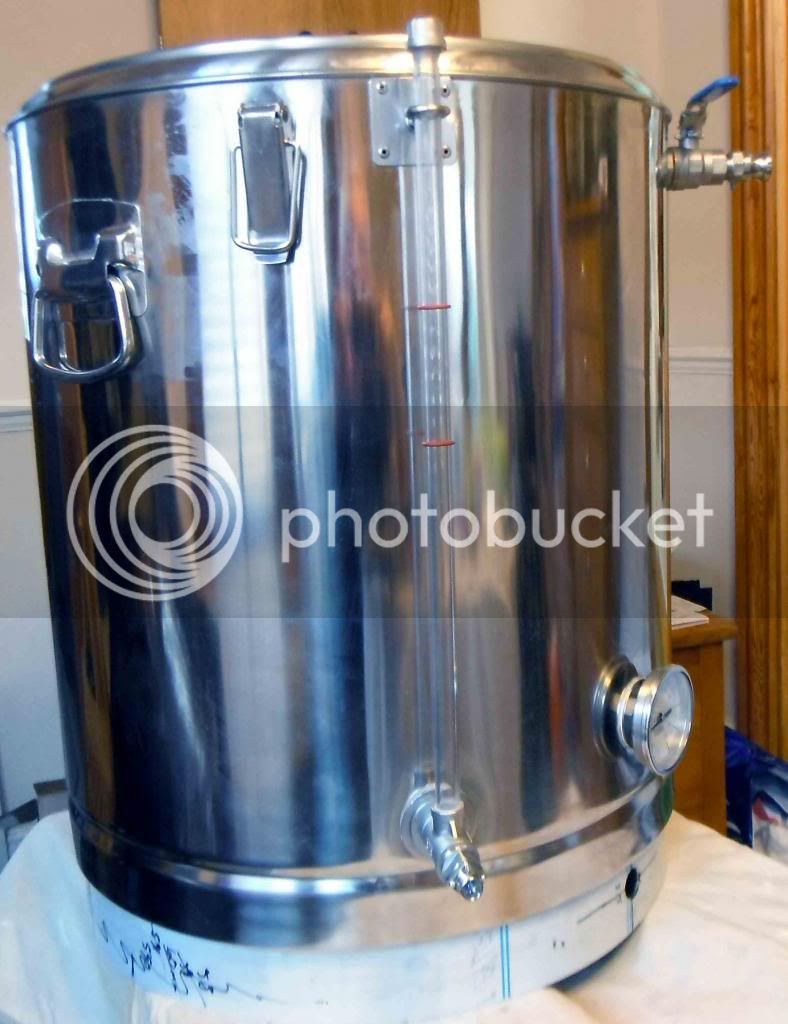
As on my other pot sight glasses, I have cut a 3/8â thread on top of the sight glass and fitted a round blanking cap loosely to stop any ingress of unwanted matter.
Some views of the inside of the pot:
The next phase of this stage will be to fit the output ball valve and test for leaks. More posts on this to follow.
I prefer to use a skirt for the drain and ball valve pipe work as I think hacking slices out of the bottom of the thermopots to accommodate the drain fittings is a less desirable approach. The od of the skirt was deliberately chosen to be 1mm less than the exact id of the bottom rim of the thermopot. This means that, due to the manufacturing tolerances of the pot, the skirt initially doesnât fit! There is an element of flexibility in the stainless steel ring, so the thing to do is to fit as much in as you can â this is about two-thirds of the circumference â and then use a sash clamp to push the ring together and knock it into place with a rubber mallet. Once all the circumference of the ring is partially in, I went round the top of the ring with a club hammer and block of wood and knocked it firmly into position, making sure that the height was the same all the way around the pot and that the pot was level when on a flat surface. (When you invert the pot to do this banging make sure it is resting on a thick blanket and a sturdy work platform.) This way of fitting the skirt means that it is such a tight fit that no bolts or welding are needed to keep it in position. Itâs never going to move! Hereâs a picture of the skirt fitted and the drain hole drilled ready for the skin fitting drain:
As I mentioned in earlier posts of My Electric Brewery construction, I am trying to emulate the design and set up of The Electric Brewery website, without the expense of buying the Blichmann Boilermaker kettles. The Boilermaker pot used as a mash tun in The Electric Brewery has a circulating ball valve, a dial thermometer, and a sight glass. But the Boilermaker is a single skinned vessel and these three items are difficult to fit through the double skin of the thermopot. However, it can be done and I will explain the way I have done it. The gap between the two walls of the thermopot is about 20mm. Two ½â BSP âOâ ring nuts from ebay (http://www.ebay.co.uk/itm/LOCKNUT-1-2-B ... 4ab69c74b7) have a combined back to back width of 19mm. A hole wide enough in the outer skin has to be drilled to take the 40mm shim that contains the expansion of the red silicone washer to make the weldless seal. To cover up this hole, a washer wider than the hole is needed. In this respect I had some washers custom made in 1.5mm thick 316 stainless which are 50mm od and 22mm id (http://www.lasermaster.co.uk/easy-order). When the assembled fitting is tightened up on the inside of the pot this large washer is pulled against the outside skin to form a neat finish and covers the hole. A homemade silicon washer behind the back of the large washer ensures a good seal. The large washer that covers the hole has to be bent into a very shallow âVâ to take account of the curvature of the pot. I did this by placing it into a vice at exactly the halfway point and giving it a few gentle taps with a hammer. The circulating ball valve and the dial thermometer were both fixed in this fashion. See pictures below:
A 5ft sparge hose will be fitted to the circulating ball valve via an elbow and a hose tail.
The lower end of the sight glass was fitted in the same weldless manner as the thermometer and recirculating ball valve. The sight glass will have a 3/8â BSP thread cut on it, and this mounts into a ½ x 3/8 x ½ Tee. A temperature probe will be fitted horizontally into the T piece to give an additional measuring point.
The top support for the sight glass is a M6 stainless steel eyebolt. The skin of the thermopot is less than 1mm thick and there is a danger that the bolt could easily pull through the thin skin. What I have done is to fit the bolt to a small plate of stainless steel, and then rivet the plate to the outer wall using stainless steel blind rivets. The plate was bent into a shallow curve to match the pot profile. The fixing doesnât penetrate the inner wall at all. Some JB Weld around the eyebolt fixing nuts, and along the edges of the plate before riveting, ensures a water tight seal and aids bonding.
As on my other pot sight glasses, I have cut a 3/8â thread on top of the sight glass and fitted a round blanking cap loosely to stop any ingress of unwanted matter.
Some views of the inside of the pot:
The next phase of this stage will be to fit the output ball valve and test for leaks. More posts on this to follow.
