Thermopot conversion

The Homebrew Forum

Help Support The Homebrew Forum:

This site may earn a commission from merchant affiliate links, including eBay, Amazon, and others.

djcorbetto

Well-Known Member
Joined
Jun 6, 2013
Messages
148
Reaction score
0
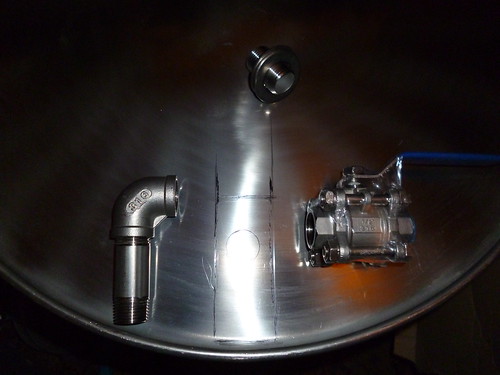
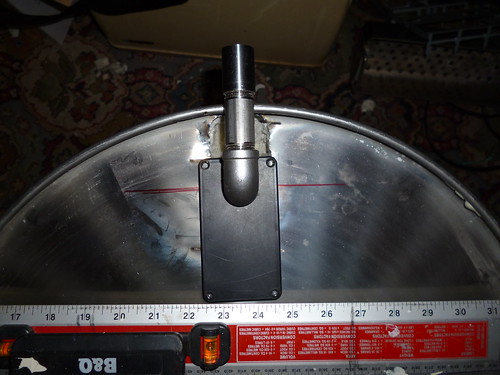
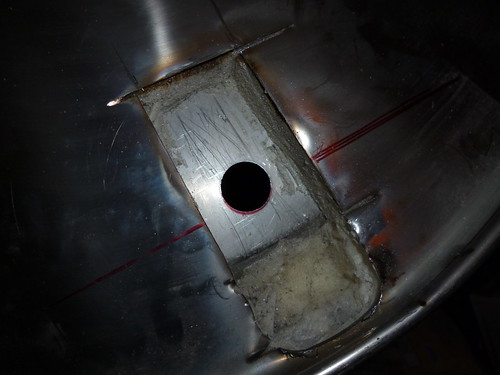
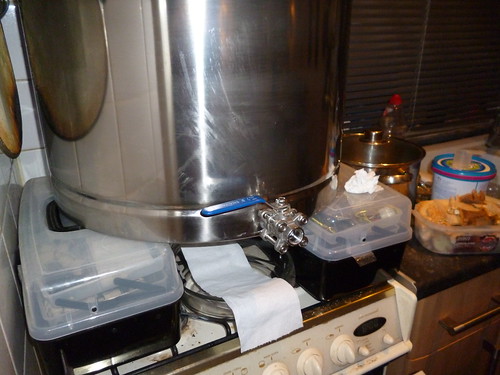
I'm converting a 80 litre thermopot and following vosseys walkthrough, I was wondering how big does the channel have to be that you seat the pipework in? I was going to get a hole cutter that cuts a hole just big enough to fit the qmax cutter in and then use the size of the hole as a guide for the width of the channel. Will this work?
 
I'm assuming you are doing this in the base. I cut out a panel about 4" wide from inside the bottom rim to just past the centre. Don't forget you need to be able to get a spanner in there to tighten up the back nut of your bottom drain fitting.

Once finished you are not going to see your handiwork and you can screw on a plate to cover the hole and hold in the insulation.
 
Don't need a slot, although with an angle girder may be easier to cut. I made 2 holes with a Starret or 64mm Cobalt hole saw, then pushed the copper pipe through. Then removed insulation from the pipe with a skewer.
20131212_161639_zps8e7a89f1.jpg
 
I was thinking of the channel so that I could change the pipe work if needed and for deep cleans.
 
or side/front mount the bottom drain, then u can not only tip to reduce deadspce to a few ml, but u only need a single ss barrel nipple to join the exit elbow to the control valve.. ;)


8380592773_c221eaf5f7.jpg
the bes.co.uk bits


8393071904_c841bef57d.jpg

Sussing out the inner pot hole location.

8395211182_bc04d24300.jpg
the hole cut


8418568816_4f6801171b.jpg
successful leak test


imho if batch sparging then minimising the deadspace with a forward tip to pull the last runings is more important than if u fly sparge where the last runings are more diluted.
 
djcorbetto said:
I was thinking of the channel so that I could change the pipe work if needed and for deep cleans.
My pipework can all be taken apart with the 2 large access holes.
A lot to be said for Fil's side bottom drain, it easier to have all stainless pipework, with his arrangement.
Although at the moment I batch sparge, I felt happier, if I ever changed to fly sparging, with the drain centred on the pot and false bottom.
 
Bobsbeer, how did you fit the thermometer through the thermopot insulation, please?
 
So I've just finished trying to cut a hole in the bottoms with a 44mm hole saw and guess what.... It failed. It just ended up making sparks and my fear is that I've hardened the steel so I guess I have two options, a bigger hole saw to cut around the dodgy hole marks of angle grinder.

On the topic of hole saws I bought an arbor from screwfix to hold the saw so can I use any brand of saw?
 
Keep hole saw cool with WD40 and lots of it. cut for 30-60sec then cool.
I used a Boch Cobalt hole drill from screwfix took at least 1/2hr per hole. Others
seem to have used Starrett . make sure you have punched a starter hole with a centre punch/pop. 44mm is a bit small for easy access to make connections.
If all else fails then resort to angle grinder it's worked for most people.
Q max of course for all other holes!!
 
Rhys, you say 44 is too small. What size woul you siggest? I was using ballistol to keep it cool but the girl deism was moaning about the smell.
 
Size depends on how you intend to make connections, room for spanners, needed. Don't know anything about the oil you used, if I was doing it again I'd use a purpose made cutting oil, just had wd40 to hand. Use the recommended speed for the hole saw. A drill with a speed control would help, I found it difficult with a finger trigger speed control to keep a steady slow speed.
 
I used 64mm Boch cobalt from screwfix. it did work in the end but was a slow job.
others seem to think Starrett are best. don't know about ebauer
 
the 3rd option behind wide hole drill and an angle grinder is the hand nibbler, just make a 10-12mm hole and nibble out the rest of the underside.
 
I also used a Screwfix /Bosch cobalt hole cutter approx 59mm close to the rim and it only took a few minutes . This left a hole large enough to manouevre into

I measured the thickness of the bottom outer layer ss once cut and it was 0.65mm so not that thick at all. Not sure if this is standard or not on Bergland pots?

What I did notice is that the outer/bottom layer is not always equidistant from the inner layer, it s a bit wavy and if you are planning to hide the pipework this is not always possible.

Mine will be draining from the side and by turning the pot upside down and putting a straight edge across the base there is just a 55mm clearance from the inner skin , probably just enough but the pipework will not be covered up again within the outer and inner layer so I will lag it

I did take some photos at the time so I will try to get around to posting them once complete.
 
I did manage to make a hole with the 44mm cutter and I see what you mean about space to manoeuvre so I will get one or two sizes bigger. I also noticed, somehow I've managed to drill the bigger hole slightl off centre from the other one so hopefully the ****** cutter can absorb this issue.
 

Latest posts

Back
Top