Cooling wort down - current setup and options

The Homebrew Forum

Help Support The Homebrew Forum:

This site may earn a commission from merchant affiliate links, including eBay, Amazon, and others.

madoIII

Active Member
Joined
Feb 20, 2017
Messages
38
Reaction score
7
Location
NULL
When it comes to cooling the wort down to pitching temperature I have seen a few different options:
- Let it cool overnight in the basement (or wherever)
- Immersion chiller
- Plate chiller
- Cool water bath
- A combination of some of the above

I got myself an immersion chiller which worked great. However, it is too small for a full batch and cooling down to 19C takes ages (way over half an hour). Which is annoying not just because of the time, but more importantly, because of the water being wasted (even if I keep it somewhere, it just feels wrong).

In the last batch, I decided to drop a couple of 2L frozen water bottles which I sanitized using Star San. This reduced the time it took to cool down but once again, it just feels wrong to dump a couple of plastic bottles in my precious wort, regardless of how well sanitized they might be. By the way, I am drinking the outcome of that brew as I type this and I am reasonably happy with the result :thumb:

My next move would be this:
1. Use immersion chiller in the kettle until temperature drops to about 60C
2. Transfer to FV, minimizing wort aeration (I have read that it is better not to aerate until wort temperature drops below 27C)
3. Drop the FV into a nice cold water bath and continue using the immersion chiller

Thoughts??

PS: yes, I need a decent immersion chiller. One day.
 
are you stirring while chilling with the IC?? keeping the brew moving over the chilling coils will improve the efficiency and cut the time it takes by half or more.
and make sure the coils are apart allowing wrt to flow between them,,
if lazy and at the end of a brewday who isnt? ;) you could consider a lil brown solar pump to move the wort for you ;)
 
In the past I've just used an immersion chiller, however my latest brew I added 2 litres of frozen water (factored this into the recipe). The water was bottled water, the same I use throughout brewday and was frozen overnight in sanitised Tupperware. Really helped chill it down quick, although next time I'll do an extra litre or two frozen to help even more. With the combo of both it got down to 29c in about 25-30 mins.
 
In the past I've just used an immersion chiller, however my latest brew I added 2 litres of frozen water (factored this into the recipe). The water was bottled water, the same I use throughout brewday and was frozen overnight in sanitised Tupperware. Really helped chill it down quick, although next time I'll do an extra litre or two frozen to help even more. With the combo of both it got down to 29c in about 25-30 mins.


Nice idea.


Sent from my iPhone using Tapatalk
 
Thanks guys!

are you stirring while chilling with the IC?? [...]
and make sure the coils are apart allowing wrt to flow between them

Yes, I do stir. Although I didn't want to stir too much while it is hot as I did not want to aerate it too much. But what you say about the coils being apart is a very good point. I will make sure I do that.

I added 2 litres of frozen water (factored this into the recipe).

To avoid confusion: are you saying you add actual water or that you add containers (bottles or tupperwares) full of frozen water?
 
I hate wasting water, but a plate chiller will do the same thing. I save all my washing up for the chilling part of the brewday: my mash tun, any paddles, spoons, other parts etc I've used, even my breakfast and lunch plates and cutlery and use all the water. Anything I don't use goes into a waterbutt which I use to water plants. As my wife runs a farm, I now put any excess water into old buckets and she takes it to her farm to water her plants. I find the cooling part goes quicker if I'm kept occupied with something as well!

Would it be worth investing in a bigger wort chiller so you could chill quicker?
 
What size wort chiller is recommended for a 25 litre Pot ?
I’m looking into wort chillers as we speak, the idea of wasting water pains me !


Sent from my iPhone using Tapatalk
 
When it comes to cooling the wort down to pitching temperature I have seen a few different options:
- Let it cool overnight in the basement (or wherever)
- Immersion chiller
- Plate chiller
- Cool water bath
- A combination of some of the above

I got myself an immersion chiller which worked great. However, it is too small for a full batch and cooling down to 19C takes ages (way over half an hour). Which is annoying not just because of the time, but more importantly, because of the water being wasted (even if I keep it somewhere, it just feels wrong).

In the last batch, I decided to drop a couple of 2L frozen water bottles which I sanitized using Star San. This reduced the time it took to cool down but once again, it just feels wrong to dump a couple of plastic bottles in my precious wort, regardless of how well sanitized they might be. By the way, I am drinking the outcome of that brew as I type this and I am reasonably happy with the result :thumb:

My next move would be this:
1. Use immersion chiller in the kettle until temperature drops to about 60C
2. Transfer to FV, minimizing wort aeration (I have read that it is better not to aerate until wort temperature drops below 27C)
3. Drop the FV into a nice cold water bath and continue using the immersion chiller

Thoughts??

PS: yes, I need a decent immersion chiller. One day.

Hi

You can easily make your own wort chiller using coiled copper tubing and a few j-clips for around 20 quid. They retail around 60 70 quid so I built my own and it cools the wort to pitching temperature within minutes if your cold water supply is naturally cold pm me if you need a chat on how to make one ������
 
6ae6648c7108db47b66a0621f31b751c.jpg


What’s this look like for size for a 25l pot ?


Sent from my iPhone using Tapatalk
 
To avoid confusion: are you saying you add actual water or that you add containers (bottles or tupperwares) full of frozen water?
I froze bottled water in tupperware, when it was time to chill I took the tupperware out when I started chilling, got to about 50c, by that point the frozen water was just starting to come away from the sides of the tupperware. I helped it on its way and just plopped the water in, no tupperware just water.
 
Since being forced to have a water meter I can't justify the wasted water with chillers and have used a no chill cube really in essence just an hdpe 25 litre jerrycan like the one on this page https://www.homebrewadventure.co.uk/products and just pour the hot wort into that and put it somewhere cold to chill. In the winter it goes out in a shed and in the summer into a cold water bath and then when cool into a cold fridge. Always get a nice clear wort and it also means you can store a batch of wort while waiting for space in the fermentation chamber helping with stock control.
 
I just checked my brewday notes and in spring my stainless wort chiller used 50 litres of water to get the temperature down from boiling to 25C in 30 minutes. In the hot weather of the last few weeks it took 60 litres in the same time. This is with constant stirring. Anglian Water charge about 0.315p per litre so my cooling cost for 60 litres is about 19p.

The used water is saved in spare fermenters, buckets etc. and used for cleaning kit afterwards. Any remaining is poured into our water butt for watering the garden.

The more coils you have, the faster you can run your tap and the faster you'll drop the temperature. More coils won't save you water though, just time.
 
Hi

You can easily make your own wort chiller using coiled copper tubing and a few j-clips for around 20 quid. They retail around 60 70 quid so I built my own and it cools the wort to pitching temperature within minutes if your cold water supply is naturally cold pm me if you need a chat on how to make one ������

Thanks man. Unfortunately, I am useless with this stuff. I love reading about how smart people like you come up with all these homemade gadgets but I am just useless :oops:

Would it be worth investing in a bigger wort chiller so you could chill quicker?

I am slowly building my kit up so needed an interim solution. I have a bunch of things I want to improve on (and invest in). A bigger chiller is one of them, but it is not at the top of the list yet.

Lots of good tips in here.

Where I live, it is almost never going to be cold enough to bring it down to 19C overnight (I live in a flat, no garden or place to leave the wort outside) - so a water bath is always going to be required.

Perhaps the best option would be to bring it down to something reasonable (30C or 40C) using the chiller and then transfer to FV and place in a super cold water bath to avoid wasting more water.

I might continue chucking in those frozen water bottles as none of you has screamed at me for doing so. After all, they would have spent days in the freezer and then I clean them with Star San (it still feels wrong though).

Thanks everyone (I love this forum):thumb:
 
Thanks man. Unfortunately, I am useless with this stuff. I love reading about how smart people like you come up with all these homemade gadgets but I am just useless :oops:

............

A good friend of mine once complained ...

"We aren't building the Taj Mahal here are we?"

... and I try to remember that phrase when I'm doing something for myself! :thumb:

A couple of hours work, two lengths of 15mm copper tubing and a load of elbows resulted in the immersion cooler below. It ain't beautiful but it gives about 0.24 square metres of cooling surface!

PS

It's only fair to point out that my mate could vandalise a rolled-steel-joist! :lol: :lol:

New Cooler MK2.jpg
 
This is mine. I use it for 25 litre brews. I made it about a decade ago now. Copper microbore radiator pipe, garden tap bits for the ends and a couple of adapters between them all soldered together. The some garden hose to go to/from the sink with garden hoselock thingies on the end and a "bath shower" kit with the shower head chopped off for the inlet hose.

I'm not sure what the bits would cost now, but it was about £35 all in at the time I think.

20rtgf5.jpg

s0vm6t.jpg


The one thing you have to do with an immersion chiller is stir. Stir like a crazy beast, stir like a person possessed! It really makes the difference. If you're not knackered by the time it's cooled down, you didn't do it properly!

If you leave your thermometer in the wort, you should be able to see the difference. Alternatively, if you look at the outlet water going back into the sink, it will be steaming when you stir, and lukewarm after a bit when you don't.
 
This is mine. I use it for 25 litre brews. I made it about a decade ago now. Copper microbore radiator pipe, garden tap bits for the ends and a couple of adapters between them all soldered together. The some garden hose to go to/from the sink with garden hoselock thingies on the end and a "bath shower" kit with the shower head chopped off for the inlet hose.

I'm not sure what the bits would cost now, but it was about �£35 all in at the time I think.

20rtgf5.jpg

s0vm6t.jpg


The one thing you have to do with an immersion chiller is stir. Stir like a crazy beast, stir like a person possessed! It really makes the difference. If you're not knackered by the time it's cooled down, you didn't do it properly!

If you leave your thermometer in the wort, you should be able to see the difference. Alternatively, if you look at the outlet water going back into the sink, it will be steaming when you stir, and lukewarm after a bit when you don't.

I just loved the conglomeration of old bath shower, garden hose-pipe and hose-pipe connections; and blush at my own very similar set up!

I use an Inkbird BBQ probe to keep an eye on the temperature as I cool the wort. It has a recording function and it's sobering to see how the wort has massive "step-down" temperature changes if I don't stir it. :doh:
 
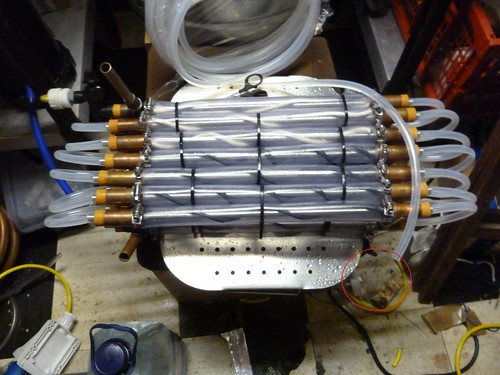
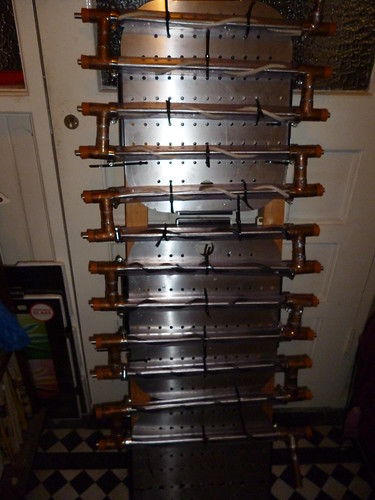
best chilling options performance wise are the counter flow chillers, usually the plate chiller heat exchanger or the tube inside hose arrangement.

the downside of both these options imho is the closed bind aspect they present.. so i went for a diy straight tube cfc

using thin walled (0.25mm) 10mm surgical stainless steel tubes to transport the beer copying the cyclone cfc
https://jadedbrewing.com/products/jaded-counterflow-chiller-cfc

15749826850_2fa7b40270.jpg


as stainless is much worse than copper at heat exchange (40x if ive read the metrics correctly) i employed 14 x 500mm lengths of SS tube.

the result can chill an off the boil brew down to pitching temp with a beer flow rate of over 3l per minute..

mid build pic
P1000186 by hunnimonstr, on Flickr
 
Back
Top