Counterflow Chiller - how long to make it?

The Homebrew Forum

Help Support The Homebrew Forum:

This site may earn a commission from merchant affiliate links, including eBay, Amazon, and others.
i made something similar using 10mm copper but chose silicone tube because of concern regarding the safe operating temperature for pvc. I soldered a spiral of copper wire around the outside of the pipe to promote turbulent flow in the cooling water.
It cools very effectively but is a bit unstable as I have yet to find a satisfactory way of holding the all the turns in the coil together. Good luck.

Have a look at fourth picture on post#14. The-Engineer-That-Brews had use zip-ties (the black vertical ties).
 
Have you made it yet mate? Be interesting to see a piccy :-)

Hi,

I'm working on but it does not go as quick as I would like. Here are some pictures:

1.JPG


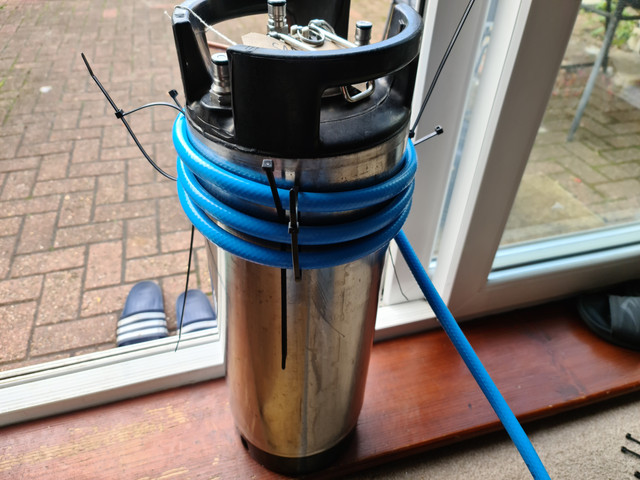
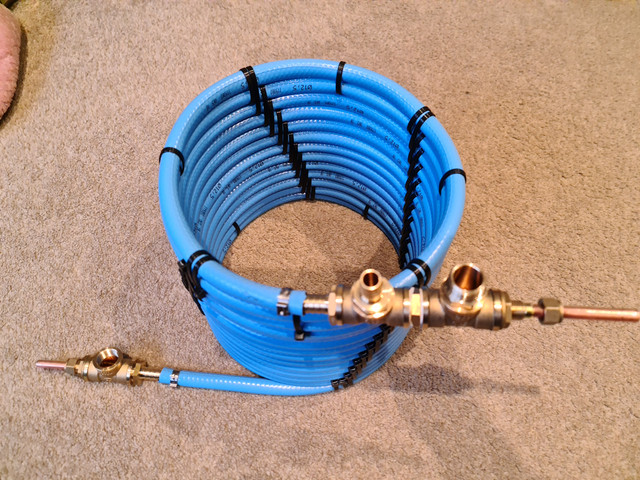
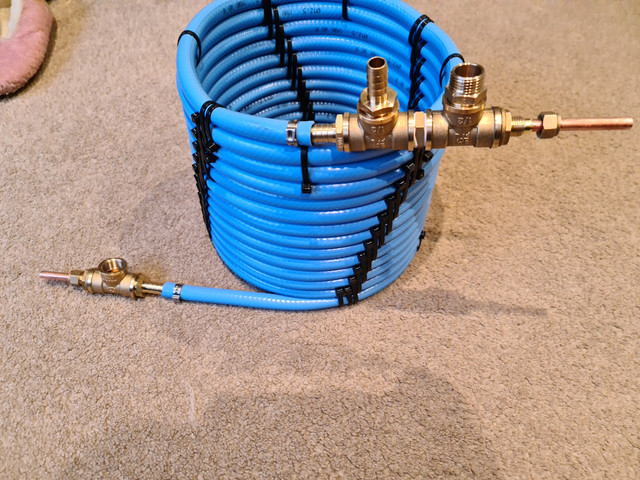
As I'm cheap, I have decided to use PVC tube for the outer sleeve . In such a case soldering was not an option so I had to use compression fittings. If you decide to use silicon tube than you may use only copper fittings.

2.JPG


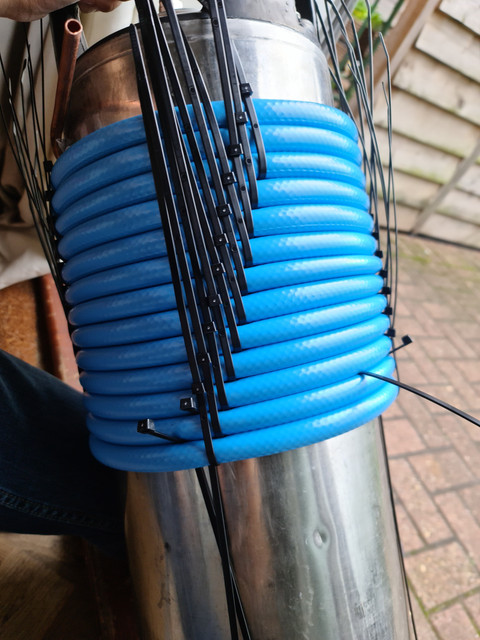
I bought 4mm2 cross section electric conductor. After stripping the insulation the wire turn to approx. be Ø2.2mm. To ease the copper wire coiling I first coiled the wire on Ø15 copper pipe. For approx. 6m long heat exchanger I had use approx. 8,5m wire . In the end I had to trim one end.

IMG_1133.JPG


I soldered one end of the copper wire about 120mm away from the copper pipe. Afterwards, I filed the "whisker" in preparation for the insertion in the PVC sleeve.

IMG_1134.JPG


As soon the solder was cool enough I pulled the copper wire along the copper pipe. It turned out that it was much easy than manually coiling the wire on the pipe. More than tis, the result looks even and nice. If one would try my method, one should take care not to allow the copper wire uncoiling.

As I have no pictures detailing some steps, I try to explain: after "pulling" the wire coil along the pipe, I had secure the "free" end with some electric tape and 2 zip-ties. I had pour a decent quantity of liquid dishwashing detergent in the PVC sleeve and I pulled the sleeve along the copper wire starting the "soldered end". It went much easier than I expected !

IMG_1137.JPG


Than, the PITA! Coiling the heat exchanger. A third hand would help but the fourth one would be better. As I had to manage the situation with only two hands, I spent 1 hours on my knees on the floor tiles whispering "incantations" to all the gods I know and the ones I will discover starting now...

As the works go on, I'll come back. By the time, if you want me to detail some issues, please, shoot.

Wow!!! This is my longest post and I'm no longer a teenager. You could imagine English is not my mother's tongue so if my formulation is unclear, please, let me know.
 

Attachments

  • 0.JPG
    0.JPG
    61 KB · Views: 48
I forgot to mention a detail about the length of the PVC sleeve. I recommend to leave it longer with 100mm at the "soldered" pipe end. At the other end, leave it 300 - 400 mm longer. You will cut the ends after the chiller coiling just before the fitting installation. I was so "intelligent" that I left only about 20mm at both end and, following my coiling struggle , I had to shorten the copper pipe...
 
I forgot to mention a detail about the length of the PVC sleeve. I recommend to leave it longer with 100mm at the "soldered" pipe end. At the other end, leave it 300 - 400 mm longer. You will cut the ends after the chiller coiling just before the fitting installation. I was so "intelligent" that I left only about 20mm at both end and, following my coiling struggle , I had to shorten the copper pipe...
Really well done and thanks very much for sharing your pictures :-)
I agree: coiling the finished tube is the hardest bit of the whole job! I was lucky because I was able to persuade my wife to come and help me with that part so I did have four hands. I also decided to use (I think) a slightly bigger diameter for the coils: I wrapped mine around a waste paper bin - diameter about 30cm. It must have been a lot harder using the 125mm diameter sewage pipe, especially with your larger diameter copper pipe...
 
As I had promise, I come back with 4 photos ("... the show must go on ... ").

First, the chiller support made of o length of the PVC pipe used for coiling, an appropriate plug to keep the chiller standing and a piece of chip board. All this was lying somewhere in the attic so this is the reason I had use them. The second photo was taken in downside direction and should show the support inner side. As you see, the cap was bolted on the board and than the pipe was pressed against the cap.

2.JPG 3.JPG

Now, the chiller almost ready. You can see the Ø18 end of the copper tee is inserted in the outer PVC sleeve and secured with metal bolt collars (sorry, I don't know the English name of this piece of hardware)..

1.JPG

And this is the final (hopefully) counter flow chiller. The water tube connections are not installed yet. The wort connections will be realized by inserting the chiller pipe in the wort tube ends and securing with metal bolt collars.

4.JPG
 
As I had promise, I come back with 4 photos ("... the show must go on ... ").

First, the chiller support made of o length of the PVC pipe used for coiling, an appropriate plug to keep the chiller standing and a piece of chip board. All this was lying somewhere in the attic so this is the reason I had use them. The second photo was taken in downside direction and should show the support inner side. As you see, the cap was bolted on the board and than the pipe was pressed against the cap.

View attachment 46848 View attachment 46847

Now, the chiller almost ready. You can see the Ø18 end of the copper tee is inserted in the outer PVC sleeve and secured with metal bolt collars (sorry, I don't know the English name of this piece of hardware)..

View attachment 46846

And this is the final (hopefully) counter flow chiller. The water tube connections are not installed yet. The wort connections will be realized by inserting the chiller pipe in the wort tube ends and securing with metal bolt collars.

View attachment 46849
Really nice piece of work clapa
I hope that you don't get any leaks from the compression joints: I always find it hard to get them tight enough - it sometimes helps to use a turn or two of PTFE tape around the thread.

As you said, with your larger (10mm) inner pipe you can use the valve to control the flow rate. Incidentally the reason I chose a thinner tube (8mm) is that I believe a thinner tube has a higher ratio of wall area (2πr) to volume (πr^2) i.e. proportional to 1/r. However I don't really think it matters very much :-)

I'm sure it will work really well. I was amazed how efficient mine is in comparison to an immersion coil. Watch out though: the cooling water gets really hot when it comes out at the top (it's worth collecting that in a spare bin so that you have a good lot of hot water for the washing up afterwards).

After I read this article by John Palmer on brewing metallurgy I decided to rinse my copper tubing through a few times with hot pickling vinegar (acetic acid) before the first use. I was really glad that I'd done it because the amount of copper oxide (the blue colour) that came off was astonishing; I'm glad that didn't end up in the beer...

IMG_5210.JPG
IMG_5209.JPG


Finally just for interest here is a photo of my counterflow in its other mode of operation as a heat exchanger for my HERMS setup.
Hot water from the temperature controlled kettle on the left is being pumped thorough the outer jacket of the counterflow, while wort from the mash tun on the right is being circulated through the inner pipe.

IMG_5211.JPG
 
Wow !!! Your chiller is huge! Congratulation!:hat:
I see you use a small centrifugal pump like the one I'm waaaiting to arrive from China (it looks like they use a wheelbarrow to transport it). Are you happy with the pump?

Re pipe diameter. I went for Ø10mm (inner Ø8) because I red about plate heat exchanger that sometime get clogged. Anyhow, by controlling the wort fluid stream speed and taken into account the flor could not be laminar, I think the 10mm pipe will work too.:rolleyes:

Yes, cleaning copper with vinegar is a good habit. Try to add one tablespoon of salt per (NaCl) liter of vinegar and you'll be surprised by the result. In the end, flush with tap water.

For sanitation, had you use bleach and vinegar solution? In my country StarSan is not available and the Amazon shipment fees for one bottle of Star San is about 70$ !!!:mad:
 
Heh - yes, for the time it takes I think they must transport those pumps over the Himalaya by yak... they are really good though.

I've got two different types and I'm very happy with them. They are the 12v brushless DC motors that you find widely advertised on eBay (etc) as 'hot water solar brushless DC'. I have some of the pale brown ones and some of the black ones - I got a few spares just to be on the safe side, but to my surprise I've never had to replace one yet... They seem perfectly happy pumping 60ºC wort for an hour of continuous running without any trouble and the flow rate and pressure are much better than I expected.

Maybe this photo gives you some idea of the flow rate - bearing in mind that this is pumping through 10m of 6mm inner diameter tube which is quite a high resistance:

IMG_5019.JPG
 
Yes, we can't get StarSan here either - but that's ok because in reality there are plenty of alternatives. For my terminal disinfectant (spray bottle just before using equipment) I use 'ChemSan' which seems to work just as well. If you search the site for 'StarSan alternatives' then you'll find quite a bit of discussion.

For general cleaning and sanitising I generally use sodium percarbonate powder: it's cheap, rinses off well and breaks down after about an hour into harmless stuff which is easy to dispose of. It's also really good for tough cleaning jobs around the house like the oven.

I did start out using bleach but I found that is was really hard to completely rinse off, and I had one batch of beer where I thought that I could still taste it a bit. I was also worried about the long-term effect on my metal brewing equipment if I forgot and left it soaking too long.

In case you haven't seen it there's a good post by @Chippy_Tea >> here << on the different cleaning/sterilising options :-)
 
Last edited:
I did start out using bleach but I found that is was really hard to completely rinse off, and I had one batch of beer where I thought that I could still taste it a bit. I was also worried about the long-term effect on my metal brewing equipment if I forgot and left it soaking too long.

Hi, please do access the site : <<https://beerliever.com/bleach-no-rinse-sanitiser-home-brewing-beer/>> . You'll find too a link to an audio file which is a record of a radio statement of the inventor of Star San. I did a google search and I found some homebrewers (not many!?) pretending that they use this substances blend since several years as their only one sanitizing substance.
 
I made one of these it was a pretty easy project.
I wrapped the pipe around a corny keg. i used alot lot of cable ties. if you follow me on instagram youll know im quite anal and things have to be perfect. waiting a few little bits to finish. Interested to see how this performs. 10 meters of 8mm copper inside 12mm hose. if its not as expected ill remake it with 25mm hose and 12mm copper.

My little dog was trying to lure me to the cupboard for treats while i was taking the photo.


Oh that’s a cracking job - nice work Sir!

10 meters of 8mm copper inside 12mm hose. if its not as expected ill remake it with 25mm hose and 12mm copper.
Actually the 8mm tube is preferable because it has a higher surface area to volume ratio - so you get more efficient heat transfer!
 

Latest posts

Back
Top