Too warm to brew?

The Homebrew Forum

Help Support The Homebrew Forum:

This site may earn a commission from merchant affiliate links, including eBay, Amazon, and others.

BoozeDude

New Member
Joined
Mar 19, 2017
Messages
11
Reaction score
5
Location
Kew, London
I made up a beer kit the other day but the ambient temperature was at least 26C, right through the night, too high to pitch the yeast. I live in a second floor flat, hence no basement, and even our balcony is something of a suntrap. So I stood the bucket in the bath full of cold water for a few days (yes it meant lifting the bucket out whenever one of us wanted to use the bath). As I type the mercury is heading back towards 25C in my place, so the bath might yet again be full of cold water and a brew bucket.

How do you keep temperatures low enough for summer brewing?

Cheers.
 
There is only one true way,buy,beg or borrow a fridge or freezer and purchase a temp controller (I recommend Inkbird)
Either that it's going to be a long summer in your bathroom,be easier keeping a dolphin alive in your tub 😉
Good luck mate
 
There is only one true way,buy,beg or borrow a fridge or freezer and purchase a temp controller (I recommend Inkbird)
Either that it's going to be a long summer in your bathroom,be easier keeping a dolphin alive in your tub 😉
Good luck mate

Ooooh, now that's fridge-tastically clever!

I had heard the term "Ink Bird" but wasn't sure what it meant until just now (that and a quick whizz around the interwebs).

Fridges have bulges inside the bottom, where the compressor lives, and ice compartments in the top, which often incorporate the gas lines, but presumably would need removing, and I'd have to drill holes through the top of the fridge wouldn't I?

Can anyone recommend a make/model of fridge suitable for this purpose?

Now, I wonder how my wife will feel about a fridge in the corner of the sitting room? :)

Cheers.
 
I use an old freezer and Inkbird. The advantage is that you can use it for lagering too, whereas a fridge generally can't reach low enough temperatures (about 1 degree). As the freezers usually also have drain-holes somewhere in the bottom, you can thread the temperature sensor in that way, without drilling any holes.

I only paid a tenner for my old freezer from Gumtree, any manufacturer will do!
 
Ooooh, now that's fridge-tastically clever!

I had heard the term "Ink Bird" but wasn't sure what it meant until just now (that and a quick whizz around the interwebs).

Fridges have bulges inside the bottom, where the compressor lives, and ice compartments in the top, which often incorporate the gas lines, but presumably would need removing, and I'd have to drill holes through the top of the fridge wouldn't I?

Can anyone recommend a make/model of fridge suitable for this purpose?

Now, I wonder how my wife will feel about a fridge in the corner of the sitting room? :)

Cheers.

Just pick up a cheap one from gumtree, or a free one from freecycle. Here is a photo of a typical brew fridge:
20121201_122756.jpg


The stand at the bottom should be strong enough to carry a full fv. The temp sensor is taped onto the side of the fv. Often you don't need to drill anything and can pass a wire through a drip hole at the back of the fridge. The one in the photo also has a heater, which can stop the temp dropping too much in winter.
 
a simple soltion although not always cheapest (£50) is the brew cool bag..

With a 2L ice bottle I can keep my fermenter at 18 degrees in a room which I would have never brewed in last year. I can go lower even..
 
Awesome!
What make/model is that?
How did you get the ice tray out?

Thanks.

It isn't mine, and I have no idea what model it is, but I suspect its just a fridge that doesn't have a freezer compartment. In fact, I don't think you can remove freezer compartments and you would have to sever the refrigerant lines. The make and model shouldn't really matter, as for most purposes you don't need to bypass any electronics or anything, just plug the fridge in to the ink bird.
 
Try and get one that doesn't have an ice box, save the hassle of trying to remove it. Or of you have the space, go for a taller larder fridge, you can then use the other space for extra storage, or 2 FVs if the mood takes you.

Have a look around the forum for 'brew fridge', there are a few construction threads on here, not that there's much construction involved.
 
Maybe not remove them but you can do this to them.
You can see the temperature rising as I had opened the door.
I use a reptile heater mat that just sits above the compressor housing.
089e9b3560945147bb6d7cfff2202059.jpg
e72f8ea88f21c014ff8d01c2ab723418.jpg
0f7b73e76021a847910e6f946e1ec948.jpg


Sent from my ALE-L21 using Tapatalk
 
One can cool down better when water evaporates, there is not enough surface area on the bath water, drape a wet towel over the fermenter and there is far more water evaporating then in the bath, have the towel draped in water so capillary action draws water up the towel and it will cool reasonable, use a fan to blow on towel and even better. However it will make room damp where the fridge/freezer route will not.

I used an old fridge/freezer, I use freezer compartment to start with then transfer to fridge after around 6 days. I use STC 1000 but InkBird was not around when I started.

This but I used a t shirt. It wicks water so more evaporates and it cools the FV more. I did it a couple of years ago and it kept mine in my garage at 20°C even when it was up to 30°C outside.

I've got a brew fridge now though. Got a larder fridge for free from Freecycle and use my brew belt for heat.
 
I actually used an old body warmer the air lock sticking out of the neck, it did work, however one needed to be monitoring the temperature, this is the problem be it bottles of ice or cloth and fans although you can cool you need to monitor the temperature, I suppose the Inkbird could control when a fan runs, but with the refrigeration unit be is a freezer or fridge you set it up and forget for 7 days.

I first saw the use of wet material used to cool in Algeria in the 1980's, the wagon drivers had their water bottle covered and would hang it off their wing mirrors. But to use latent heat of evaporation means you are filling the room with very humid air, so the room needs ventilating, the drier the air the better it works, also the more surface area the better, but there comes a point where the material is insulating too much, so keeping beer warm.

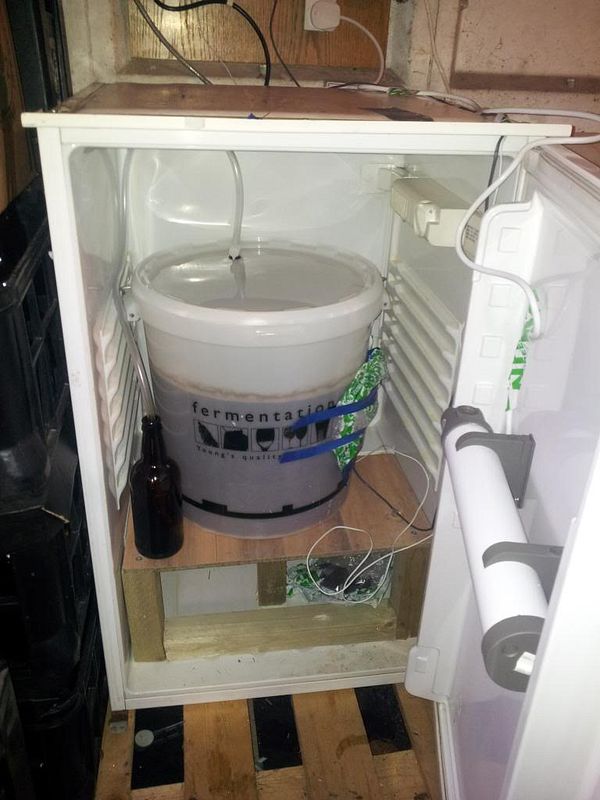
This is also a problem with a fridge, it stops the heat leaving the fermenter, so without a fridge I could brew 9 months of the year with brew getting too hot, with a fridge the motor runs 9 months of the year as the heat can't escape without it running. However it only runs for first few days of starting a brew, once the first few days are over it does not run. My idea was to use the old fridge/freezer in the garage so moving brewing out of kitchen and not using the motor, however I was forced to use motor once in the fridge the box kept in the heat. Idea of leaving door open did not work, I would forget inside the garage. However after being in the freezer compartment for 6 days held at 19°C I could then move it to fridge compartment which has no cooling for the remaining 14 days before I bottle. The garage temperature may go up and down from 12°C to 30°C between day and night, but inside the fridge the temperature remains steady with only heating at 22°C.

I would not now want to brew without my fridge/freezer, but know it can be done if your willing to put in enough time and effort to control the temperature, the problem is without the fine temperature control you get with a brew fridge, any experiment with the beer, your not sure if result is due to experiment or due to temperature. Once I moved to the brew fridge method, I realised my stick on temperature strip is measuring an average between brew temperature and ambient temperature, once I started using a sensor held against the side of fermenter under a sponge to insulate it from ambient I noted in the brew fridge how to start with the sensor was showing hotter than the stick on strip, but as the fermenting draws to an end the two show the same temperature.

Before the brew fridge I had worked out 17°C was the point where the yeast became dormant, at 18°C it was working happily, but when I started to use brew fridge I found 18°C was point where yeast became dormant, 19°C was the temperature required for everything to work well, the difference was not the temperature, but method of measuring temperature, the stick on stick was measuring some where between air temperature and fermenter temperature.

This error in measuring the temperature means likely when I thought my brew was at 22°C in the kitchen likely it was hotter than that, it also meant when it was showing 18°C at end of brewing it was likely too cold, which explained why I had some very long times before the hydrometer dropped enough to bottle.

I am talking about my errors measuring temperature as if you cover the fermenter with wet cloth you will also be unable to use any temperature gauge which is being cooled directly by the cloth, I got a thermometer with a sensor for outside from Lidi, I could dangle that sensor into the brew, so I had a measurement centre of brew, and on the outside of fermenter under a sponge, it showed 0.7°C difference as start of new brew centre being warmer. Once I knew this I stopped measuring at centre as it could contaminate the brew. I also used same device to measure air temperature in freezer and compare to brew temperature at start, with brew starting at 22°C and set point 19°C the sensor under the sponge held hard against the fermenter showed steady drop to 19°C over an hours, it did not over shoot, the air temperature however went down to 8°C then compressor switched off, it rose to 16°C then compressor started again dropped to 10°C compressor stopped second time and then the two temperatures slowly both started to read 18°C air and 19°C brew for next few days. I would say that 75W motor ran for around 45 minutes in all to reduce the temperature that 3°C, that is a lot of energy to remove just 3°C from the fermenter, with wet towels it would take all day to cool it that much, so what you need to do is not let it get hot to start with.

Using some 2 litre bottles which have been frozen in the freezer to cool the brew is in many ways easier, you have brew at 24°C you want 19°C so 5°C to remove bottles still have a little water unfrozen so assume at zero so 80 x 2 litre latent heat of fusion plus 19 x 2 litre = around 100 x 2 litre so 22/2 = 11 so 100/11 = 10°C one bottle will cool, since there is heat being also added by brewing and ambient, one bottle every 24 hours will likely cool it enough.
 
Back
Top