Temperature Control Box Build

The Homebrew Forum

Help Support The Homebrew Forum:

This site may earn a commission from merchant affiliate links, including eBay, Amazon, and others.
I was thinking the same a full reset back to factory settings as loads seem to be different, I also clocked the pt100 setting but thought as so much is not the same as the manual it could possibly be.
 
Fil said:
and a possible conflict with alarm 1 with al1=0000 (off) but sl4= alarm 1 high deviation.

I tried setting SL4 to zero already and that didn't work. I changed the AR to 100, and that didn't change anything. I don't if I can do a factory reset on it. I looked through the manual and didn't see anything about it and didn't find anything on google either.

Any other ideas?
 
In order to sus out my own pid controller, a sestos import from hong kong, i did a lot of reading around the subject, most of which was above my math capability and the rest ive forgotten or probably got confused over..
I use this reference for the parameters http://auberins.com/images/Manual/Manua ... %203.4.pdf
while for a different model/make again, its operartion is Very Similar to my own.. how similar to yours?? but it explains in detail how the alarms and relays can all work together much better than the single sheet that came with the sestos unit.

However this issue may just be a feature.:). your unit can also cool as well as heat, it may be weighting of the current value to accommodate the function of cooling as your changing the set point down?
validate your unit by settng a lower temp target, and waiting for the unit to indicate that its hit set point and then verify the probe readings??

as long as it indicates an accurate temp at target temps, any features of it getting there are irrelevant.

if however the temp readings differ from your unit and your reference thermometer at targets, then its not just a feature?

if still a problem i would look at the easiest link in the chain first. the probes. where are you if close you can borrow my probes and a ktype thermocouple to aid testing..

its unlikely a bug is running in the software, its too simple, and any physical damage would just stop it working. so if the probes/thermocouples all test ok then it must a miss setting.. possibly an innocent error during initialisation.. its not a dvd or blueray so there shouldnt be any setting timeouts or counts on anything so anything done CAN be undone.. just a case of workin out how..
 
Fil said:
if still a problem i would look at the easiest link in the chain first. the probes.

I just opened the box back up and wired the probes directly to the PIDs just to make sure that resistance from the XLR connectors wasn't causing the problem, but that still didn't fix the problem.

I'm starting to wonder if I just got a bad batch of probes like you were suggesting. I live in Austria, so I'm sure it's a bit too far to stop by and test your probes on my box, but thanks for the offer.

It would be nice if someone who recently bought good probes on ebay could link me to the auction that they bought theirs from. That way, when I buy the probes, I'll know that they at least worked for someone else. Then if I'm still having problems I'll know to move on to the PIDs.

Unless someone else has another idea???
 
Loetz said:
I just ordered one of these dudes:

http://cgi.ebay.de/ws/eBayISAPI.dll?ViewItem&item=221069146944&ssPageName=ADME:X:DERP:DE:1123

Hopefully swapping the probe works!
dbl checking the manual you posted.. did you twist the power in and power out wires as suggested. perhaps untwisted they are having an effect on the probe wires?? straws!. clutching! i know.. perhaps shielding the probe or power cables??

I will be emulating your test when i wire up my temp pid enclosure for the next brew day, set my sv 20 or so degrees lower than the pv when at target and watch the display intently..
 
Fil said:
dbl checking the manual you posted.. did you twist the power in and power out wires as suggested?

Yep, but I'm still not convinced that it's not an electrical noise problem. I might get some wire insulation to wrap around those power cables if the new probe doesn't work.
 
Dear all,
I am not involved in any step of beer brewing except the emptying of prefilled bottles... Nonetheless I came here the Google way searching for other people working with the C100 type PID regulators.

In the last weeks I have done extended testing of the behavior of RKC REX-C100 regulators because I also found the influence of SV to Measured Value.

After testing again and again and excluding all other reasons it seems the regulators are programmed to look better than they actually are.

The PID function tries its best to bring the PV to the SV, but if the PV comes into a window of several °C the "lying feature" is activated and the PV reading is drawn in the direction of the SV, so if the PV iss too low it is displayed higher and if the PV is shooting a bit over it is displayed lower than real.

I did not measure the Size of this "lying window" but I found out it is not affecting the regulation in the background, so if the temperature shoots over at first this is regulated and in longer time the real Temperature and PV display become identical.

The behavior is similar to the "plateau function" of today's cars engine temperature gauge which shows a constant temperature regardless what exact temperature is measured.

Currently I am trying to figure out how to change this as it does not feel good to know your PID regulator is lying about what's going on, even if it does not affect the process.

At least I think overshooting could be minimized in reproducible systems by the autotune function as residual heat of heating element and thermal mass should be compensated this way. As the thermal mass and heating power are not constant in my current setup I did not test the autotune funktion.


Regards

Edit:
@ Loetz: Your wiring diagram does not show a Ground (green) connection between the power input Ground and the probe shielding Ground. This could be dangerous if the probes are screwed into nonconductive and/or ungrounded receptacles. If your target device is conductive (not only the beer inside) and grounded properly I agree with your drawing (This arrangement could even be required if you have to avoid compensating current due to different power sources). Although this may seem a bit exaggerated at first view we are talking of very cheap chinese technology and can't rely on the safety of their design. One of these regulators used here blew up on first use spreading boiling capacitor electrolyte in his near surrounding...

________

I tried uploading a explaining picture external but insertig external link seems to be not allowed for early users. Please somebody open this link (without spaces) and insert it here.

http://www.pic-upload.de/view-18777712/L--genfunktion-Darstellung.png.html (Edit: The link does not seem to work as written)

Edit#2:
@ Loetz: Another Thing: On the first page you asked about refrigerating. It is possible to set the regulator to reverse action, so refrigeration is possible. But this has already been discussed.

Only thing to add: You can easily use this Regulator to control a fan circulating cooled air or a pump circulating cooled water instead of switching a cooling device directly. When doing so the regulating loop can be set to longer timebase so the fan/pump is not switched extremely often. In case you use brushless driven devices this will not significantly decrease their service life. This works great, I tried in different applications (Water, Air).

Now to the more important: The setpoint can not be negative, so the deepest temperature to set is 0°C although the PV can display up to -199,9°C. In this point you can do something not very intuitive: Switch to the Fahrenheit scale. If set to °F scale the minimum setpoint is still 0 but 0°F is -17,8°C and voilà we have a freezer instead of a refrigerator. This is near enough to -18°C to build a [****] freezer using this unit. In case you do this I recommend to print out a °C to °F conversion table and glue it to the front panel next to the regulator.
 
fyi sestos pids in cooling mode accept -ve C temps happily :)
thats a lot of info to digest dave, cheers for the insights
seems youve spent a while looking at this..
 
As says Bill G. it's not a bug, it's a functionality. What a strange functionality isn't it ?

This functionality answer to a major question : how to screw up your boss who constantly asked you why that damn measurement "PV" value is fluctuating and not equal to "SV". I had a chance to work in China so I know quite well the china way of life :) The easiest answer to this fundamental question is : just tamper the "PV" value. And what is the easiest way to tamper the "PV" value ? just copy the "SV" to "PV" shown on display if real "PV" is close enough to "SV". A boss normally never touch the setpoint "SV" and will not discover the trick :)

This functionallity should be named "f..k your boss" but here it's just named "Digital Filtering", "dF" in Short. Just put that value to 0.

It's the last setting of hidden menu Cod 0001

I'm use to see these kind of trick in chinese PLC software but I was astonished to see this in PID controller firmware and, worst of all, activated by default.

Regards.
 
UPDATE:

Thanks to the input of Dave and Theirry, I managed to turn off the 'lying' feature. Theirry's method worked and it now shows what the PID is actually doing!

Now I get to WATCH it when it overshoots the SV! Yay! :roll:

Thanks again to Dave and Thierry for your help! I'll post your solution in the details section of my youtube video so that other people can see it.
 
I did an autotune by setting aru to 0001 and it doesn't seem to be overshooting anymore. It took a while to autotune. I'm not sure how long it took because I went to the grocery store while it was working, but it had been tuning for at least 10 minutes when I left.
 
Many Thanks to Thierry!

I have read the extended Manual inbcluding the hidden sub-menues but i did not get the connection between "Digital Filtering" and the "JustMakeMeThinkEverythingsOK" Feature.

Kind Regards
Dave

P.S.: Thanks to Loetz, your PM brought this thread back to my active projects!
 
DavePlastics said:
Many Thanks to Thierry!

I have read the extended Manual inbcluding the hidden sub-menues but i did not get the connection between "Digital Filtering" and the "JustMakeMeThinkEverythingsOK" Feature.

Kind Regards
Dave

P.S.: Thanks to Loetz, your PM brought this thread back to my active projects!

Hi can anyone point me in the direction of the "extended manual with hidden sub menus". Have been having the same difficulty.

Thanks
 
Interesting topic - I have one on these in the my control box and was getting ready to bin the pid and get another type.

I've scanned the manual page to show how you get to the hidden menu - clicky to see the pdf
Just finished a brew so will now play with the settings to see if it behaves any better on the next brew.
 
Reading my last post I understand why I should not be posting after midnight... Ofcourse I understood the next morning... :doh:

Thanks to Loetz (PM) and mixale (scan), in the versions of the Manual I have, the settings are only described in crude chinese-english text style.
The extended Manual I referred to was one I found by Google, the small piece of paper contained in the Package did not describe anything except setting the SV value.

In the meantime I did some comparision between the old ones I had in stock and some newly ordered regulators. It seems while changing to lead free solder process the PCB layout was slightly changed. (Found no new board with leaded solder and vice versa)

- A Useless Solder Bridge in the power trace to relay working contact has disappeared
- Some spare holes for using many different relay types have disappeared
- One of the more bewildering: Three SMD resistors have been replaced by 1/8W wired parts (No, it's not related to power dissipation, I measured. And no, they did not completely avoid SMD process by this, there are some SMD parts still used on the same PCB, maybe they are preparing to remove SMD parts on one of the two boards in a future revision.)
- At least one metal film resistor in the display group has been changed to a carbon film type
- The ribbon cable between the boards is no longer split at the one end, the needless unconnected pad in the center of the line was removed.

The clean conversion from relay output to Voltage output by comparing the original boards is as follows:

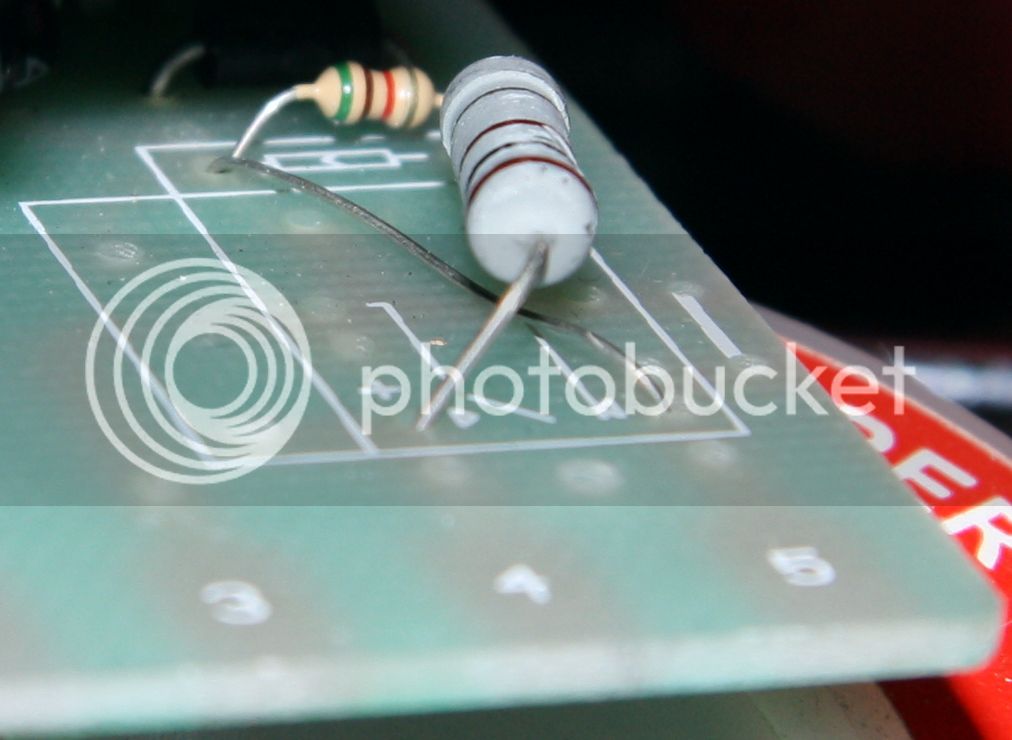
- Bridge the relay coil pads by a 5.1kR 1/8 or 1/4W
- Route a plain wire from the left coil pad to the right output pad
- Route a 100R 1 or 2W type from the right coil pad to the left output pad
- YES on the 'relay coil' side there are two wires in each hole, even on the older ones which have plenty of spare pads and holes
Right and left as seen from the component side.

This is a picture of the correct configuration for voltage output. (Original chinese quality with shattered resistor coating... :wha: )
IMG_1481_cut_zps877e393a.jpg


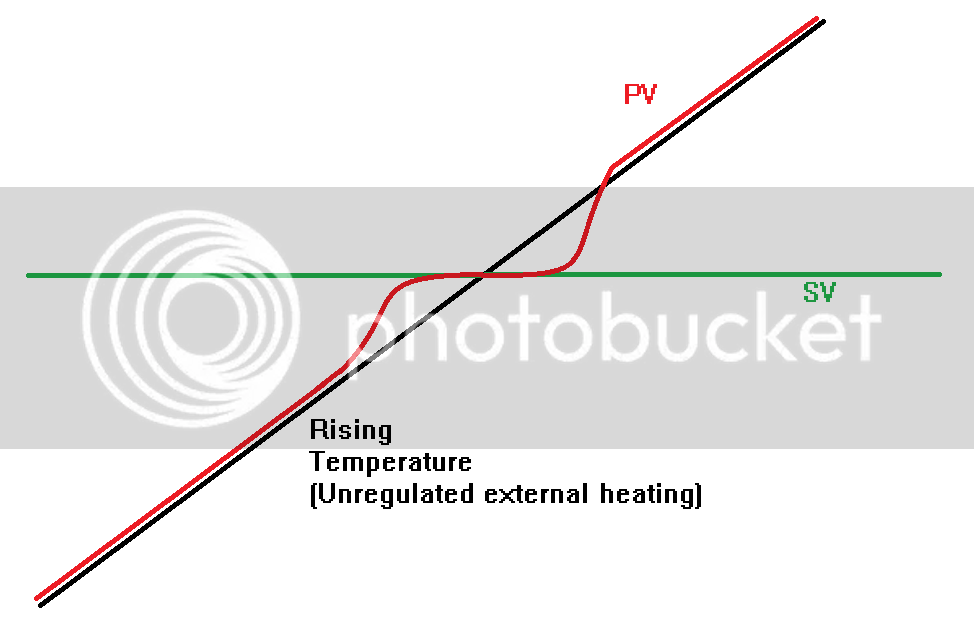
Here is the graph from my upper posting, which has been lost in the abyss of the previously chosen free image hoster.
LuumlgenfunktionDarstellung__zpsb8f34fd2.png


edit:
For the conversion to voltage output... remove the relay first... makes job much easier... :mrgreen:
 

Latest posts

Back
Top